
Yamaha YZF-R125 Service Manual: Electrical components
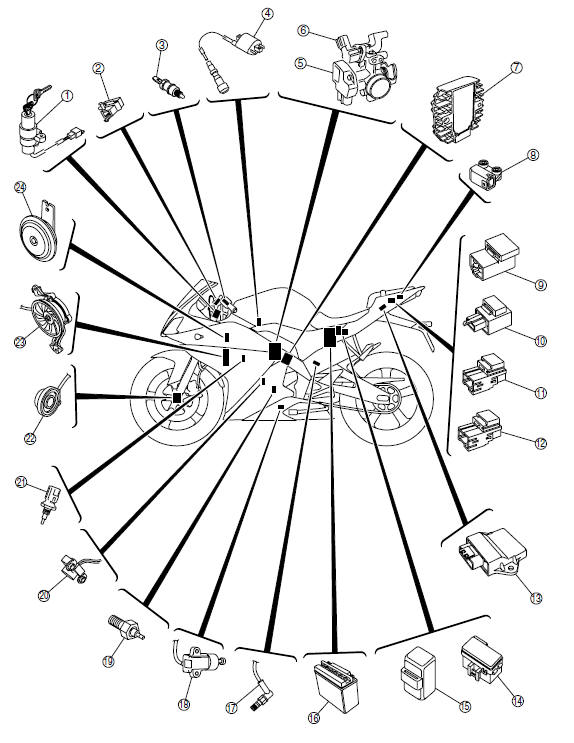
1. Main switch
2. Clutch switch
3. Front brake light switch
4. Ignition coil
5. Throttle body sensor assembly (intake air pressure sensor, intake air temperature sensor, throttle position sensor)
6. FID (fast idle solenoid)
7. Rectifier/regulator
8. Lean angle sensor
9. Starting circuit cut-off relay
10.Turn signal relay
11.Radiator fan motor relay
12.Headlight relay
13.ECU (engine control unit)
14.Fuse box
15.Starter relay
16.Battery
17.Rear brake light switch
18.Sidestand switch
19.Neutral switch
20.Crankshaft position sensor
21.Coolant temperature sensor
22.Speed sensor
23.Radiator fan
24.Horn
- Checking the switches
- Checking the bulbs and bulb sockets
- Checking the fuses
- Checking and charging the battery
- Checking the relays
- Checking the turn signal relay
- Checking the diode
- Checking the spark plug cap
- Checking the ignition coil
- Checking the ignition spark gap
- Checking the crankshaft position sensor
- Checking the lean angle sensor
- Checking the starter motor operation
- Checking the stator coil
- Checking the rectifier/regulator
- Checking the horn
- Checking the fuel sender
- Checking the speed sensor
- Checking the radiator fan motor
- Checking the coolant temperature sensor
- Checking the throttle body sensor assembly
- Checking the fid (fast idle solenoid)
 Troubleshooting
If the fuel pump fails to operate.
NOTE:
Before troubleshooting, remove the following part(s):
1. Rider seat
2. Fuel tank
...
 Checking the switches
1. Clutch switch
2. Main switch
3. Front brake light switch
4. Sidestand switch
5. Rear brake light switch
6. Neutral switch
7. Turn signal switch
8. Horn switch
9. Dimmer switch
10.Pass ...
Other materials:
Setting the diagnostic mode
1. Set the main switch to "OFF" and the engine stop switch to "
".
2. Disconnect the self-diagnosis signal connector "1", and then connect the FI
diagnostic tool "2" as
shown.
3. Disconnect the fuel pump coupler.
4. While pressing the "MODE" button, set the main switch to "ON".
NOTE:
...
Loading
Adding accessories or cargo to your
motorcycle can adversely affect stability
and handling if the weight distribution
of the motorcycle is changed. To avoid
the possibility of an accident, use extreme
caution when adding cargo or
accessories to your motorcycle. Use
extra care when ridi ...
Owner's tool kit
Owner's tool kit
Owner's tool kit
Engine oil drain attachment
The owner's tool kit is located under the
rider seat.
The service information included in this
manual and the tools provided in the
owner's tool kit are intended to assist
you in the performance of preventive
maint ...