Yamaha YZF-R125 Service Manual: Checking and charging the battery
| WARNING Batteries generate explosive hydrogen gas and contain electrolyte which is made of poisonous and highly caustic sulfuric acid. Therefore, always follow these preventive measures:
FIRST AID IN CASE OF BODILY CONTACT: EXTERNAL
INTERNAL
|
1. Remove:
- Rider seat Refer to "GENERAL CHASSIS" on page 4-1.
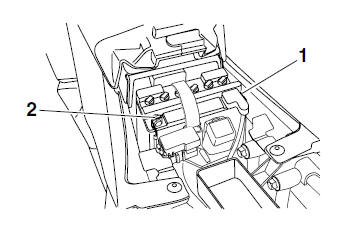
2. Disconnect:
- Battery leads (from the battery terminals)
| CAUTION: First, disconnect the negative battery lead "1", then the positive battery lead "2". |
3. Remove:
- Battery
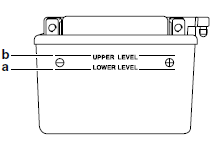
4. Check:
- Electrolyte level
The electrolyte level should be between the
minimum level mark "a" and the maximum
level mark "b".
Below the minimum level mark
 Add
Add
distilled water to the proper level.
| CAUTION: Add only distilled water. Tap water contains
minerals which are harmful to the battery. |
5. Check:
- Specific gravity
Less than 1.280
 Recharge the
battery.
6. Charge:
- Battery
Battery charging amperage and time 5.5 amps/10 hrs
WARNING
Do not quick charge a battery.
CAUTION:
|
NOTE:
- Replace the battery whenever:
- battery voltage does not rise to specification or bubbles fail to rise during charging,
- sulphation of one or more battery cells occurs (as indicated by the battery plates turning white or material accumulating in the bottom of the battery cell),
- specific gravity readings after a long, slow charge indicate that one battery cell's charge is lower than the rest,
- warpage or buckling of the battery plates or insulators is evident.
7. Check:
Battery breather hose and battery vent Obstruction → Clean.
Damage → Replace.
8. Install:
- Battery
9. Connect:
- Battery breather hose "1"
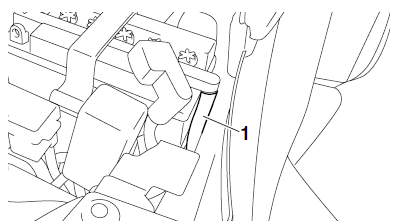
CAUTION:
|
10.Check:
- Battery terminals
Dirt → Clean with a wire brush.
Loose connection → Connect properly.
11.Connect:
- Battery leads (to the battery terminals)
| CAUTION: First, connect the positive battery lead "1", then the negative battery lead "2". |
12.Lubricate:
- Battery terminals

13.Install:
- Rider seat Refer to "GENERAL CHASSIS" on page 4-1.
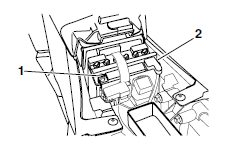
 Checking the fuses
The following procedure applies to all of the fuses.
CAUTION:To avoid a short circuit, always turn the
main
switch to "OFF" when checking or replacing
a fuse.
1. Remove:
Ri ...
 Checking the relays
Check each switch for continuity with the pocket
tester. If the continuity reading is incorrect, replace
the relay.
1. Disconnect the relay from the wire harness.
2. Connect the pocket tester ( ...
Other materials:
Checking the drive sprocket
1. Check:
Drive sprocket
More than 1/4 tooth "a" wear
Replace the
drive chain sprockets as a set.
Bent teeth Replace the drive
chain sprockets
as a set.
b. Correct
1. Drive chain roller
2. Drive chain sprocket
Checking the rear wheel sprocket
Refer to "CHECKING AND R ...
Checking the front brake caliper
1. Check:
Brake caliper pistons "1"
Rust/scratches/wear Replace the
brake
caliper assembly.
Brake caliper body "2"
Cracks/damage Replace the brake
caliper
assembly.
Brake fluid delivery passages
(brake caliper body)
Obstruction Blow out with
compressed air.
...
Parking
When parking, stop the engine, and
then remove the key from the main
switch.
WARNING
Since the engine and exhaust
system can become very hot,
park in a place where pedestrians
or children are not likely to
touch them and be burned.
Do not park on a slope or on soft
ground, ...