Yamaha YZF-R125 Service Manual: Installing the crankshaft
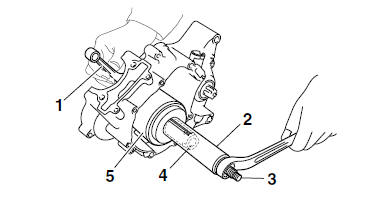
1. Install:
- Crankshaft "1"
NOTE:
Install the crankshaft with the crankshaft installer
pot "2", crankshaft installer bolt "3", adapter
(M12) "4" and spacer (crankshaft installer) "5".
| CAUTION: To avoid scratching the crankshaft and to ease the installation procedure, lubricate the oil seal lips with lithium-soap-based grease and each bearing with engine oil. |
NOTE:
Hold the connecting rod at top dead center (TDC) with one hand while turning the nut of the crankshaft installer bolt with the other. Turn the crankshaft installer bolt until the crankshaft bottoms against the bearing.
 Checking the crankshaft
1. Measure:
Crankshaft runout
Out of specification Replace
the crankshaft,
bearing or both.
NOTE:
Turn the crankshaft slowly.
2. Measure:
Big end side clearance
Out of speci ...
 Transmission
...
Other materials:
Fuel
Make sure there is sufficient gasoline in
the tank.
WARNING
Gasoline and gasoline vapors are
extremely flammable. To avoid fires
and explosions and to reduce the
risk of injury when refueling, follow
these instructions.
Before refueling, turn off the engine
and be sure that no on ...
Checking the transmission
1. Measure:
Main axle runout
(with a centering device and dial gauge "1")
Out of specification Replace
the main axle.
2. Measure:
Drive axle runout
(with a centering device and dial gauge "1")
Out of specification Replace
the drive axle.
3. Check:
Transmiss ...
Incorrect engine idling speed
Engine
1. Cylinder and cylinder head
Incorrect valve clearance
Damaged valve train components
2. Air filter
Clogged air filter element
Fuel system
1. Throttle body
Damaged or loose throttle body joint
Improperly adjusted engine idling speed (idle
adjusting screw)
Improper ...