Yamaha YZF-R125 Service Manual: Crankshaft
 Assembling the crankcase
1. Thoroughly clean all the gasket mating surfaces
and crankcase mating surfaces.
2. Apply:
Sealant
(onto the crankcase mating surfaces)
NOTE:
Do not allow any sealant to come into conta ...
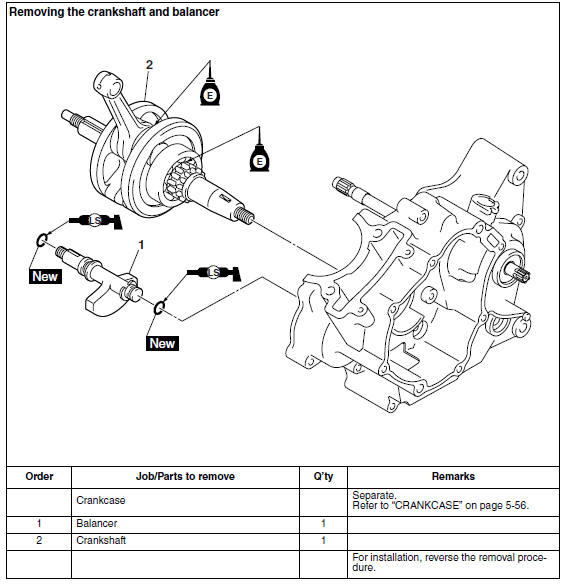
 Removing the crankshaft
1. Remove:
Crankshaft "1"
NOTE:
Remove the crankshaft with the crankcase
separating tool "2".
Make sure the crankcase separating tool is
centered over the crankshaft.
CAUTIO ...
Other materials:
Checking the fuel line
1. Remove:
Left side panel
Refer to "GENERAL CHASSIS" on page 4-1.
2. Lift the fuel tank. (Do not disconnect the fuel
hose, drain hose
3. Check:
Fuel hose "1"
Cracks/damage → Replace.
Loose connection Connect properly.
4. Install:
Fuel tank
Refer to "FUEL TANK" on pa ...
Replacing the headlight bulbs
The following procedure applies to the low beam
headlight bulb.
1. Remove:
Headlight bulb cover "1"
2. Remove:
Headlight bulb holder "1"
3. Remove:
Headlight bulb "1"
WARNINGSince the headlight bulb gets extremely
hot,
keep flammable products and your ...
Catalytic converters
This vehicle is equipped with catalytic
converters in the exhaust system.
WARNING
The exhaust system is hot after operation.
To prevent a fire hazard or
burns:
Do not park the vehicle near
possible fire hazards such as
grass or other materials that
easily burn.
Park the vehic ...