Yamaha YZF-R125 Service Manual: Installing the exhaust assembly
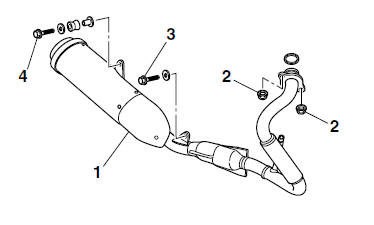
1. Install:
- Exhaust assembly "1"
- Exhaust pipe nuts "2"
- Exhaust assembly bolts "3" "4"
NOTE:
Do not fully tighten the nuts and bolts.
2. Tighten:
- Exhaust pipe nuts "2"

- Exhaust assembly bolt "4"

- Exhaust assembly bolt "3"

 Installing the shift arm
1. Install:
Shift arm "1"
NOTE:
Make sure that the distance "a" between the
center of the left rider footrest "2" and the center
of the shift pedal "3" is within specification.
...
 Cylinder head
* Yamaha bond No. 1215 (Three Bond No. 1215) ...
Other materials:
Parking
When parking, stop the engine, and
then remove the key from the main
switch.
WARNING
Since the engine and exhaust
system can become very hot,
park in a place where pedestrians
or children are not likely to
touch them and be burned.
Do not park on a slope or on soft
ground, ...
Indicator and warning lights
Indicator and warning lights
Neutral indicator light""
Turn signal indicator light""
High beam indicator light""
Engine trouble warning light""
Coolant temperature warning light""
Turn signal indicator light""
This indicator light flashes when the
turn signal switch is pushed t ...
Removing the fuel tank
1. Extract the fuel in the fuel tank through the
fuel tank filler hole with a pump.
2. Remove:
Fuel hose connector cover "1"
3. Disconnect:
Fuel hose "2"
CAUTION:
Be sure to disconnect the fuel hose by
hand. Do not forcefully disconnect the
hose with tools.
A ...