
Yamaha YZF-R125 Service Manual: Checking the front brake pads
The following procedure applies to all of the brake pads.
1. Operate the brake.
2. Check:
- Front brake pad
Wear indicator grooves "a" have almost disappeared

Replace the brake pads as a set.Refer to "FRONT BRAKE" on page 4-17.
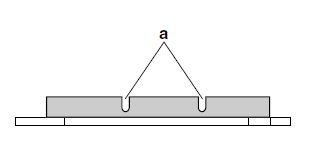
 Checking the brake fluid level
1. Stand the vehicle on a level surface.
NOTE:
Place the vehicle on a suitable stand.
Make sure the vehicle is upright.
2. Check:
Brake fluid level
Below the minimum level mark "a" → ...
 Checking the rear brake pads
The following procedure applies to all of the
brake pads.
1. Operate the brake.
2. Check:
Rear brake pad
Wear indicator groove "a" has almost disappeared
Replace the brake pads as a set. ...
Other materials:
Checking the starter motor operation
1. Check:
Starter motor operation
Does not operate → Perform the electric
starting system troubleshooting, starting with
step 4.
Refer to "TROUBLESHOOTING" on page
8-9.
a. Connect the positive battery terminal "1" and
starter motor lead "2" with a jumper lead "3".
W ...
Installing the starter clutch
1. Install:
Starter clutch assembly
Starter clutch bolts "1"
NOTE:
While holding the generator rotor "2" with the
sheave holder "3", tighten the starter clutch
bolts.
Do not allow the sheave holder to touch the
projection on the generator rotor.
Stake the end "a" of each start ...
Checking the spark plug
The spark plug is an important engine
component, which is easy to check.
Since heat and deposits will cause any
spark plug to slowly erode, the spark
plug should be removed and checked
in accordance with the periodic maintenance
and lubrication chart. In addition,
the condition of the ...