Yamaha YZF-R125 Service Manual: Installing the water pump
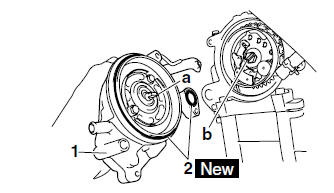
1. Install:
- Water pump assembly "1"
- O-rings "2"

NOTE:
- Align the projection "a" on the impeller shaft with the slit "b" on the camshaft sprocket bolt.
- Lubricate the O-rings with a thin coat of lithiumsoap- based grease.
2. Fill:
- Cooling system (with the specified amount of the recommended coolant)
Refer to "CHANGING THE COOLANT" on page 3-15.
3. Check:
Cooling system
Leaks  Repair or replace the faulty
part.
4. Measure:
Radiator cap opening pressure
Below the specified pressure
Replace the
radiator cap.
Refer to "CHECKING THE RADIATOR" on page 6-3.
 Assembling the water pump
1. Install:
Water pump seal "1"
(into the water pump housing "2")
CAUTION:Never lubricate the water pump seal
surface
with oil or grease.
NOTE:
Install the water pump ...
 Fuel system
...
Other materials:
Installing the rear wheel (disc)
1. Install:
Rear brake disc
NOTE:
Tighten the brake disc bolts in stages and in a
crisscross pattern.
2. Check:
Rear brake disc
Refer to "CHECKING THE REAR BRAKE
DISC" on page 4-33.
3. Lubricate:
Rear wheel axle
Contact surface of rear wheel hub and rear
wheel
Whee ...
Checking and adjusting the steering head
1. Stand the vehicle on a level surface
WARNINGSecurely support the vehicle so that there
is
no danger of it falling over.
NOTE:
Place the vehicle on a suitable stand so that the
front wheel is elevated.
2. Check:
Steering head
Grasp the bottom of the front fork legs an ...
Disassembling the rear brake caliper
1. Remove:
Brake caliper piston "1"
Brake caliper piston dust seal "2"
Brake caliper piston seal "3"
a. Blow compressed air into the brake hose joint
opening "a" to force out the piston from the
brake caliper.
WARNING
Cover the brake caliper piston with a rag.
Be careful no ...