Yamaha YZF-R125 Service Manual: Assembling the water pump
1. Install:
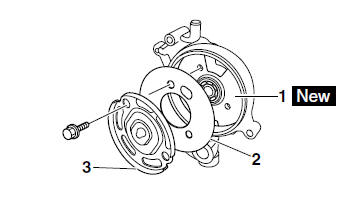
- Water pump seal "1"

(into the water pump housing "2")
| CAUTION: Never lubricate the water pump seal surface with oil or grease. |
NOTE:
- Install the water pump seal with the special tools.
- Install the water pump seal with the special
tools to the specified depth as shown in the illustration.
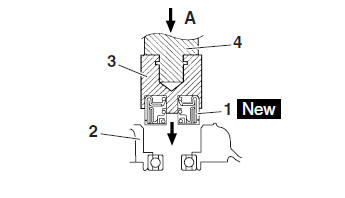
A. Push down
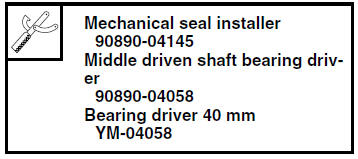
3. Mechanical seal installer
4. Middle driven shaft bearing driver
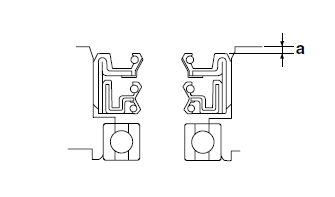
a. 0-0.5 mm (0-0.02 in)
2. Lubricate:
- Water pump seal lip

3. Install:
- Water pump housing gasket "1"

- Water pump housing plate "2"
- Impeller shaft
- Impeller shaft retainer "3"
NOTE:
- Before installing the impeller shaft retainer, lubricate the slit on the impeller shaft end with a thin coat of lithium-soap-based grease.
- Install the water pump housing gasket, water pump housing plate, and impeller shaft retainer as shown in the illustration.
- After installation, check that the impeller shaft rotates smoothly.
 Checking the water pump
1. Check:
Water pump housing cover
Water pump housing
Cracks/damage Replace.
Impeller shaft
Cracks/damage/wear Replace.
Bearing
Rough movement Replace.
Radiator outlet hose
Crac ...
 Installing the water pump
1. Install:
Water pump assembly "1"
O-rings "2"
NOTE:
Align the projection "a" on the impeller shaft
with the slit "b" on the camshaft sprocket bolt.
Lubricate the O-rings with a thi ...
Other materials:
Checking the water pump
1. Check:
Water pump housing cover
Water pump housing
Cracks/damage Replace.
Impeller shaft
Cracks/damage/wear Replace.
Bearing
Rough movement Replace.
Radiator outlet hose
Cracks/damage Replace.
...
Checking the crankshaft
1. Measure:
Crankshaft runout
Out of specification Replace
the crankshaft,
bearing or both.
NOTE:
Turn the crankshaft slowly.
2. Measure:
Big end side clearance
Out of specification Replace
the crankshaft.
3. Measure:
Crankshaft width
Out of specification&nbs ...
Installing the primary drive gear and balancer gears
1. Install:
Balancer driven gear "1"
Lock washer
Balancer drive gear "2"
Primary drive gear
Washer "3"
Balancer driven gear nut
Primary drive gear nut
NOTE:
Align the punch mark "a" in the balancer drive
gear "2" with the punch mark "b" in the balancer
driven gear "1".
...