Yamaha YZF-R125 Service Manual: Checking the front brake disc
1. Remove:
- Front wheel Refer to "FRONT WHEEL" on page 4-6.
2. Check:
- Brake disc
Damage/galling
 Replace.
3. Measure:
- Brake disc deflection
Out of specification
 Correct the
brake disc deflection or replace the brake disc.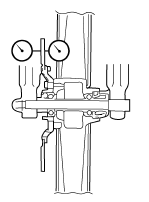

a. Place the vehicle on a suitable stand so that the front wheel is elevated.
b. Before measuring the front brake disc deflection, turn the handlebar to the left or right to ensure that the front wheel is stationary.
c. Remove the brake caliper.
d. Hold the dial gauge at a right angle against the brake disc surface.
e. Measure the deflection 1.5 mm (0.06 in) below the edge of the brake disc.
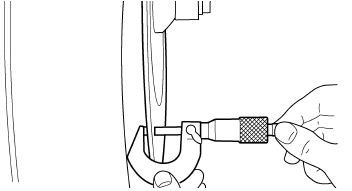
4. Measure:
- Brake disc thickness
Measure the brake disc thickness at a few different
locations.
Out of specification
 Replace.

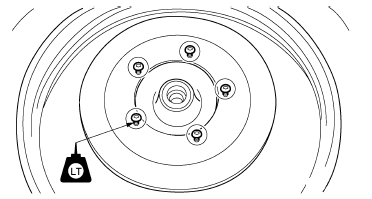
5. Adjust:
- Brake disc deflection
a. Remove the brake disc.
b. Rotate the brake disc by one bolt hole.
c. Install the brake disc.
NOTE:
Tighten the brake disc bolts in stages and in a crisscross pattern.
d. Measure the brake disc deflection.
e. If out of specification, repeat the adjustment steps until the brake disc deflection is within specification.
f. If the brake disc deflection cannot be brought within specification, replace the brake disc.
6. Install:
- Front wheel Refer to "FRONT WHEEL" on page 4-6.
 Introduction
WARNINGDisc brake components rarely require
disassembly.
Therefore, always follow these preventive
measures:
Never disassemble brake components unless
absolutely necessa ...
 Replacing the front brake pads
NOTE:
When replacing the brake pads, it is not necessary
to disconnect the brake hose or disassemble
the brake caliper.
1. Measure:
Brake pad wear limit "a"
Out of specification Replace
...
Other materials:
Removing the rear wheel (disc)
1. Stand the vehicle on a level surface.
WARNINGSecurely support the vehicle
so that there is
no danger of it falling over.
2. Elevate:
Rear wheel
NOTE:
Place the vehicle on a suitable stand so that the
rear wheel is elevated.
3. Remove:
Rear brake caliper
NOTE: ...
Checking the front and rear brake pads
The front and rear brake pads must be
checked for wear at the intervals specified
in the periodic maintenance and
lubrication chart.
Front brake pads
Remove the front brake caliper by
removing the bolts.
Bolt
Brake caliper
Lining thickness
Check each front br ...
Installing the swingarm
1. Lubricate:
Bearings
Spacers
Dust covers
Pivot shaft
2. Install:
Bearings "1"
2. Swingarm
A. Left side
B. Right side
3. Install:
Swingarm adjusting collar "1"
Swingarm "2"
Pivot shaft
Pivot shaft nut "3"
a. Install, and then fully turn in the swingarm adju ...