Yamaha YZF-R125 Service Manual: Checking the cylinder and piston
1. Check:
- Piston wall
- Cylinder wall
Vertical scratches
 Replace the
cylinder, and replace the piston and piston rings as a set.
2. Measure:
- Piston-to-cylinder clearance
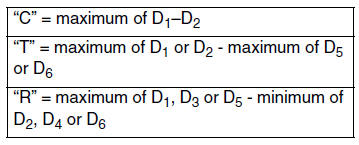
a. Measure cylinder bore "C" with the cylinder bore gauge.
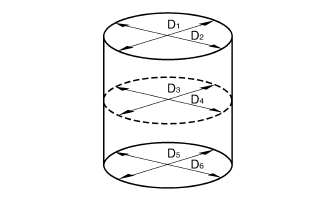
NOTE:
Measure cylinder bore "C" by taking side-to-side and front-to-back measurements of the cylinder.
Then, find the average of the measurements.
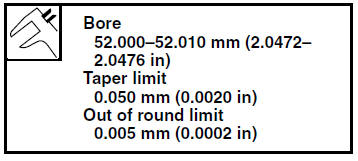
b. If out of specification, replace the cylinder, and replace the piston and piston rings as a set.
c. Measure piston skirt diameter D "a" with the micrometer.
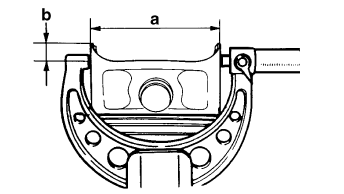
b. 5.0 mm (0.20 in) from the bottom edge of the
piston 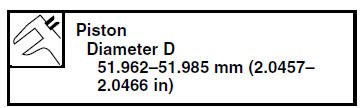
d. If out of specification, replace the piston and piston rings as a set.
e. Calculate the piston-to-cylinder clearance
with the following formula. 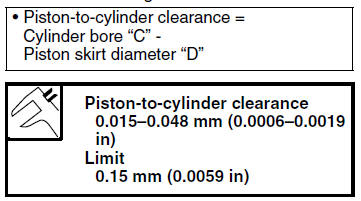
f. If out of specification, replace the cylinder, and replace the piston and piston rings as a set.
 Removing the piston
1. Remove:
Piston pin clips "1"
Piston pin "2"
Piston "3"
CAUTION:Do not use a hammer to drive the piston
pin
out.
NOTE:
Before removing the piston pin c ...
 Checking the piston rings
1. Measure:
Piston ring side clearance
Out of specification Replace the
piston
and piston rings as a set.
NOTE:
Before measuring the piston ring side clearance,
eliminate any carbon deposits ...
Other materials:
Troubleshooting
Although Yamaha motorcycles receive
a thorough inspection before shipment
from the factory, trouble may occur during
operation. Any problem in the fuel,
compression, or ignition systems, for
example, can cause poor starting and
loss of power.
The following troubleshooting charts
repre ...
Disassembling the water pump
1. Remove:
Water pump seal "1"
NOTE:
Remove the water pump seal from the inside of
the water pump housing "2".
2. Remove:
Bearing "1"
NOTE:
Remove the bearing from the outside of the water
pump housing "2".
...
Checking the front brake disc
1. Remove:
Front wheel
Refer to "FRONT WHEEL" on page 4-6.
2. Check:
Brake disc
Damage/galling Replace.
3. Measure:
Brake disc deflection
Out of specification Correct the
brake disc
deflection or replace the brake disc.
a. Place the vehicle on a suitable stand ...