Yamaha YZF-R125 Service Manual: Removing the starter clutch
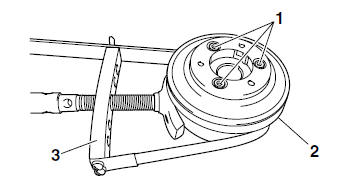
1. Remove:
- Starter clutch bolts "1"
NOTE:
- While holding the generator rotor "2" with the sheave holder "3", remove the starter clutch bolts.
- Do not allow the sheave holder to touch the
projection on the generator rotor.
 Removing the generator
1. Remove:
Generator rotor nut "1"
Washer
NOTE:
While holding the generator rotor "2" with the
sheave holder "3", loosen the generator rotor
nut.
Do not allow the sheave holder to t ...
 Checking the starter clutch
1. Check:
Starter clutch rollers "1"
Starter clutch spring caps "2"
Starter clutch springs "3"
Damage/wear Replace the starter
clutch
assembly.
2. Check:
Starter clutch idle ge ...
Other materials:
Intake air pressure sensor
1. Check:
Intake air pressure sensor output voltage
Out of specification Replace the throttle
body.
a. Connect the pocket tester (DC 20 V) to the
throttle body sensor assembly coupler as
shown.
Positive tester probe
pink/white "1"
Negative tester probe
gray/black "2"
...
Checking the drive chain
1. Measure:
15-link section "a" of the drive chain
Out of specification Replace the drive
chain.
a. Measure the length "a" between the inner
sides of the pins and the length "b" between
the outer sides of the pins on a 15-link section
of the drive chain as shown in the illustration.
...
Installing the shift forks and shift drum assembly
1. Install:
Shift fork-L "1"
Shift fork-C "2"
Shift fork-R "3"
Shift drum assembly "4"
Springs
Shift fork guide bar "5"
NOTE:
The embossed marks on the shift forks should
face towards the right side of the engine and be
in the following sequence: "R", "C", "L".
2. Check:
Tr ...