Yamaha YZF-R125 Service Manual: Checking the starter clutch
1. Check:
- Starter clutch rollers "1"
- Starter clutch spring caps "2"
- Starter clutch springs "3"
Damage/wear  Replace the starter
clutch
assembly.
2. Check:
- Starter clutch idle gear
- Starter clutch gear Burrs/chips/roughness/wear Replace the defective part(s).
3. Check:
- Starter clutch gear contacting surfaces Damage/pitting/wear Replace the starter clutch gear.
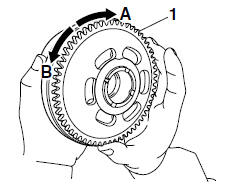
4. Check:
- Starter clutch operation
a. Install the starter clutch gear "1" onto the starter clutch and hold the generator rotor.
b. When turning the starter clutch gear clockwise "A", the starter clutch and the starter clutch gear should engage, otherwise the starter clutch is faulty and must be replaced.
c. When turning the starter clutch gear counterclockwise
"B", it should turn freely, otherwise
the starter clutch is faulty and must be replaced.
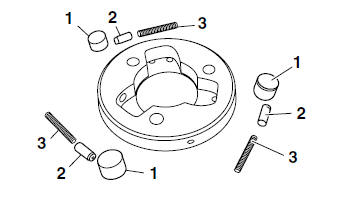
 Removing the starter clutch
1. Remove:
Starter clutch bolts "1"
NOTE:
While holding the generator rotor "2" with the
sheave holder "3", remove the starter clutch
bolts.
Do not allow the sheave holder to touch th ...
 Installing the starter clutch
1. Install:
Starter clutch assembly
Starter clutch bolts "1"
NOTE:
While holding the generator rotor "2" with the
sheave holder "3", tighten the starter clutch
bolts.
Do not allow t ...
Other materials:
Adjusting the brake pedal free play
Adjusting the brake pedal free play
Brake pedal free play
The brake pedal free play should measure
3.5-4.5 mm (0.14-0.18 in) as
shown. Periodically check the brake
pedal free play and, if necessary, have
a Yamaha dealer adjust it.
WARNING
An incorrect brake pedal free play
in ...
Multi-function display
Multi-function display
Multi-function display
"RESET/SELECT" button
WARNING
Be sure to stop the vehicle before
making any setting changes to the
multi-function display. Changing
settings while riding can distract the
operator and increase the risk of an
accident.
The multi- ...
Adjusting the clutch cable free play
1. Check:
Clutch cable free play "a"
Out of specification Adjust.
2. Adjust:
Clutch cable free play
a. Pull back the rubber cover "1"
b. Loosen the locknut "2".
c. Turn the adjusting bolt "3" in direction "a" or
"b" until the specified clutch cable free play is
obtained.
...