Yamaha YZF-R125 Service Manual: Removing the cylinder head
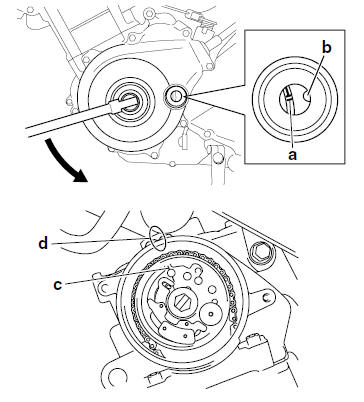
1. Align:
- "I" mark "a" on the generator rotor (with the stationary pointer "b" on the generator cover)
a. Turn the crankshaft counterclockwise.
b. When the piston is at TDC on the compression stroke, align the "I" mark "c" on the camshaft sprocket with the mark "d" on the cylinder head.
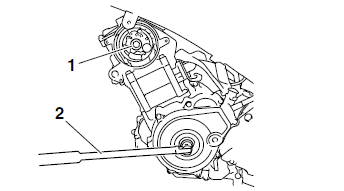
2. Loosen:
- Camshaft sprocket bolt "1"
NOTE:
While holding the generator rotor nut with a wrench "2", loosen the camshaft sprocket bolt.
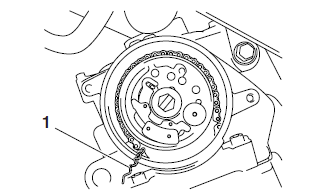
3. Remove:
- Camshaft sprocket
NOTE:
To prevent the timing chain from falling into the crankcase, fasten it with a wire "1".
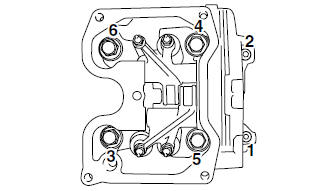
4. Remove:
- Cylinder head
NOTE:
- Loosen the bolts in the proper sequence as shown.
- Loosen each bolt 1/2 of a turn at a time. After all of the bolts are fully loosened, remove bolts 1, 2, 4, and 6, and then remove the cylinder head with bolts 3 and 5 installed in the bolt holes.
 Cylinder head
* Yamaha bond No. 1215 (Three Bond No. 1215) ...
 Checking the cylinder head
1. Eliminate:
Combustion chamber carbon deposits
(with a rounded scraper)
NOTE:
Do not use a sharp instrument to avoid damaging
or scratching:
Spark plug bore threads
Valve seats
...
Other materials:
Outline of the fi system
The main function of a fuel supply system is to provide fuel to the
combustion chamber at the optimum
air-fuel ratio in accordance with the engine operating conditions and the
atmospheric temperature. In
the conventional carburetor system, the air-fuel ratio of the mixture that is
supplied t ...
Installing the shift shaft
1. Install:
Stopper lever "1"
Stopper lever spring "2"
NOTE:
Install the stopper lever spring as shown in the
illustration.
Hook the ends of the stopper lever spring onto
the stopper lever and the crankcase boss "3".
Mesh the stopper lever with the shift drum segment
assembly. ...
Front wheel
To remove the front wheel
WARNING
To avoid injury, securely support the
vehicle so there is no danger of it
falling over.
Loosen the front wheel axle pinch
bolt, then the wheel axle and the
brake caliper bolts.
Front wheel axle pinch bolt
Lift the front wheel of ...