Yamaha YZF-R125 Service Manual: Multi-function display
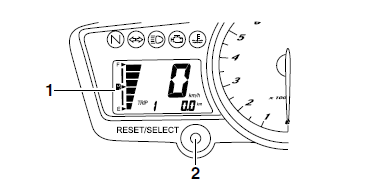
1. Multi-function display
2. "RESET/SELECT" button
- The multi-function display is equipped with the following:
- a speedometer (which shows the riding speed)
- an odometer (which shows the total distance traveled)
- two tripmeters (which show the distance traveled since they were last set to zero)
- a fuel reserve tripmeter (which shows the distance traveled since the fuel level warning light came on)
- a fuel meter
NOTE:
- Be sure to turn the key to "ON" before using the "RESET/ SELECT" button.
- For the U.K. only: To switch the speedometer and odometer/tripmeter displays between kilometers and miles, press the "RESET/SELECT" button for at least eight seconds.
Odometer and tripmeter modes
A brief push (less than one second) on the "RESET/ SELECT" button switches the display between the odometer mode "ODO" and the tripmeter modes "TRIP 1" and "TRIP 2" in the following order:
ODO →TRIP 1 →TRIP 2 → ODO
When approximately 1.6 L (0.42 US gal) (0.35 Imp.gal) of fuel remains in the fuel tank, the odometer display will automatically change to the fuel reserve tripmeter mode "F-TRIP" and start counting the distance traveled from that point, and the last segment of the fuel meter will start flashing. In that case, pushing the "RESET/ SELECT" button switches the display between the various tripmeter and odometer modes in the following order:
F-TRIP → TRIP 1 → TRIP 2 → ODO → F-TRIP
To reset a tripmeter, select it by pushing the "RESET/SELECT" button briefly (less than one second), and then push the button for at least three seconds while the selected tripmeter is flashing. If you do not reset the fuel reserve tripmeter manually, it will reset itself automatically and the display will return to the prior mode after refueling and traveling 5 km (3 mi).
Fuel meter
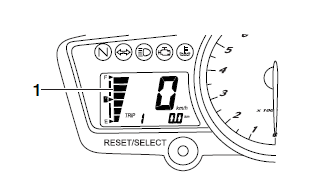
1. Fuel meter
The fuel meter indicates the amount of fuel in the fuel tank. The display segments of the fuel meter disappear towards "E" (Empty) as the fuel level decreases. When the last fuel meter segment starts flashing, refuel as soon as possible.
 Fi system
The fuel pump delivers fuel to the fuel injector via the fuel filter. The
pressure regulator maintains the
fuel pressure that is applied to the fuel injector at only 250 kPa (2.50 kg/cm²,
36 ...

Other materials:
Checking the front fork
The condition and operation of the front
fork must be checked as follows at the
intervals specified in the periodic maintenance
and lubrication chart.
To check the condition
Check the inner tubes for scratches,
damage and excessive oil leakage.
To check the operation
Place the vehicle ...
Incorrect engine idling speed
Engine
1. Cylinder and cylinder head
Incorrect valve clearance
Damaged valve train components
2. Air filter
Clogged air filter element
Fuel system
1. Throttle body
Damaged or loose throttle body joint
Improperly adjusted engine idling speed (idle
adjusting screw)
Improper ...
Checking the starter motor operation
1. Check:
Starter motor operation
Does not operate → Perform the electric
starting system troubleshooting, starting with
step 4.
Refer to "TROUBLESHOOTING" on page
8-9.
a. Connect the positive battery terminal "1" and
starter motor lead "2" with a jumper lead "3".
W ...