Yamaha YZF-R125 Service Manual: Installing the rear brake caliper
1. Install:
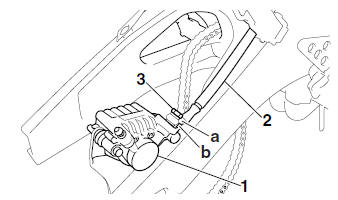
- Brake caliper "1"

- Copper washers
- Brake hose "2"
- Union bolt "3"

| WARNING Proper brake hose routing is essential to insure safe vehicle operation. Refer to "CABLE ROUTING" on page 2-33. |
| CAUTION: When installing the brake hose onto the brake caliper, be sure to position the brake pipe "a" into the slot "b" in the brake caliper. |
2. Install:
- Brake pad spring
- Brake pads
- Brake pad retaining bolts
- Rear brake caliper
Refer to "REPLACING THE REAR BRAKE
PADS" on page 4-33.
3. Install:
- Rear wheel Refer to "REAR WHEEL" on page 4-12.
4. Fill:
- Brake fluid reservoir
(with the specified amount of the recommended
brake fluid)

WARNING
|
| CAUTION: Brake fluid may damage painted surfaces and plastic parts. Therefore, always clean up any spilt brake fluid immediately. |
5. Bleed:
- Brake system Refer to "BLEEDING THE HYDRAULIC BRAKE SYSTEM" on page 3-20.
6. Check:
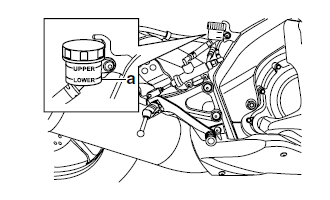
- Brake fluid level
Below the minimum level mark "a"

Add the recommended brake fluid to the proper level.Refer to "CHECKING THE BRAKE FLUID LEVEL" on page 3-18.
7. Check:
- Brake pedal operation
Soft or spongy feeling
 Bleed
Bleed
the brake system.Refer to "BLEEDING THE HYDRAULIC BRAKE SYSTEM" on page 3-20.
 Assembling the rear brake caliper
WARNING
Before installation, all internal brake components
should be cleaned and lubricated
with clean or new brake fluid.
Never use solvents on internal brake components
as ...
 Removing the rear brake master cylinder
NOTE:
Before removing the rear brake master cylinder,
drain the brake fluid from the entire brake system.
1. Disconnect:
Rear brake light switch coupler
2. Loosen:
Rear brake light switc ...
Other materials:
Installing the fuel hose
1. Install:
Fuel hose
Fuel hose connector cover
CAUTION:When installing the fuel hose, make sure
that
it is securely connected, and that the fuel
hose connector cover is in the correct position,
otherwise the fuel hose will not be properly
installed.
NOTE:
W ...
Checking the ignition coil
1. Check:
Primary coil resistance
Out of specification Replace.
a. Disconnect the ignition coil connectors from
the ignition coil terminals.
b. Connect the pocket tester ( × 1)
to the ignition
coil as shown.
Positive tester probe
red/white "1"
Negative tester probe
orange ...
General information
NOTICEThis manual was produced by MBK Industrie.
primarily for use by Yamaha dealers and their qualified
mechanics. It is not possible to include all the knowledge of a mechanic
in one manual. Therefore, anyone
who uses this book to perform maintenance and repairs on Yamaha vehi ...