
Yamaha YZF-R125 Service Manual: Removing the rear brake master cylinder
NOTE:
Before removing the rear brake master cylinder, drain the brake fluid from the entire brake system.
1. Disconnect:
- Rear brake light switch coupler
2. Loosen:
- Rear brake light switch "1"
3. Remove:
- Rear brake master cylinder bolts
- Rear brake master cylinder
4. Remove:
- Rear brake light switch "1"
- Copper washers "2"
- Brake hose "3"
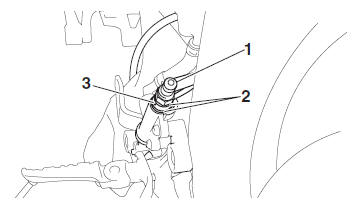
NOTE:
To collect any remaining brake fluid, place a container under the master cylinder and the end of the brake hose.
 Installing the rear brake caliper
1. Install:
Brake caliper "1"
Copper washers
Brake hose "2"
Union bolt "3"
WARNINGProper brake hose routing is essential to
insure
safe vehicle operation. Refer to "CABLE
...
 Checking the rear brake master cylinder
1. Check:
Brake master cylinder
Damage/scratches/wear Replace.
Brake fluid delivery passages
(brake master cylinder body)
Obstruction Blow out with
compressed air.
2. Check:
Brake ...
Other materials:
Removing and installing the cowlings and panel
Removing and installing the cowlings and panel
Cowling A
Cowling B
Cowling C
Cowling D
Panel A
The cowlings and panel shown need to
be removed to perform some of the
maintenance jobs described in this
chapter. Refer to this section each time
a cowling or panel needs to be ...
Adjusting the throttle cable free play
Throttle cable free play
The throttle cable free play should measure
3.0-5.0 mm (0.12-0.20 in) at the
throttle grip. Periodically check the
throttle cable free play and, if necessary,
adjust it as follows.
TIP
The engine idling speed must be correctly
adjusted before checkin ...
Installing the rear shock absorber assembly
1. Install:
Rear shock absorber assembly
Relay arm "1"
NOTE:
Install the relay arm as shown in the illustration.
2. Tighten:
Rear shock absorber assembly upper nut
Relay arm nut
Rear shock absorber assembly lower nut
3. Install:
Connecting arms
NOTE:
When ins ...