Yamaha YZF-R125 Service Manual: Installing the generator
1. Install:
- Woodruff key
- Generator rotor
- Washer
- Generator rotor nut
NOTE:
- Clean the tapered portion of the crankshaft and the generator rotor hub.
- When installing the generator rotor, make sure the woodruff key is properly sealed in the keyway of the crankshaft.
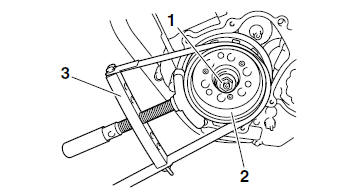
2. Tighten:
- Generator rotor nut "1"

NOTE:
- While holding the generator rotor "2" with the sheave holder "3", tighten the generator rotor nut.
- Do not allow the sheave holder to touch the
projection on the generator rotor.
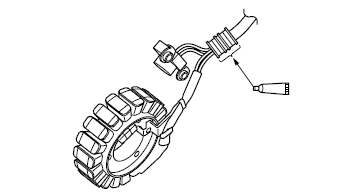
3. Apply:
- Sealant
(onto the crankshaft position sensor/stator
assembly lead grommet)
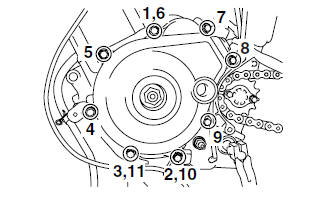
4. Install:
- Generator cover

NOTE:
Tighten the generator cover bolts in the proper tightening sequence as shown.
 Installing the starter clutch
1. Install:
Starter clutch assembly
Starter clutch bolts "1"
NOTE:
While holding the generator rotor "2" with the
sheave holder "3", tighten the starter clutch
bolts.
Do not allow t ...
 Electric starter
...
Other materials:
Removing the primary drive gear and balancer gears
1. Loosen:
Primary drive gear nut "1"
NOTE:
Place the aluminum plate "a" between the balancer
drive gear "2" and the balancer driven
gear "3", and then loosen the primary drive gear
nut.
2. Straighten the lock washer tab.
3. Loosen:
Balancer driven gear nut "1"
NOTE:
Place ...
Replacing the front brake pads
NOTE:
When replacing the brake pads, it is not necessary
to disconnect the brake hose or disassemble
the brake caliper.
1. Measure:
Brake pad wear limit "a"
Out of specification Replace
the brake
pads as a set.
2. Install:
Brake pad support
Brake pad spring
Brake pads ...
Removing the front fork legs
The following procedure applies to both of the
front fork legs.
1. Stand the vehicle on a level surface.
WARNINGSecurely support the vehicle so that there
is
no danger of it falling over.
2. Loosen:
Handlebar pinch bolt "1"
Handlebar bolt "2"
Upper bracket ...