Yamaha YZF-R125 Service Manual: Installing the clutch
1. Install:
- Conical spring washer "1"
NOTE:
Install the conical spring washer as shown in the illustration.
2. Install:
- Clutch housing
- Thrust washer "1"
NOTE:
Be sure to install the thrust washer so that its sharp edge "a" is facing away from the clutch boss.
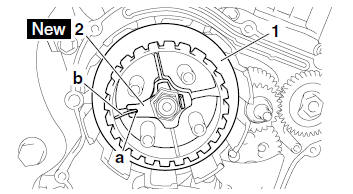
3. Install:
- Clutch boss "1"
- Lock washer "2"

- Clutch boss nut
NOTE:
- Lubricate the clutch boss nut threads and lock washer mating surfaces with engine oil.
- Align the notch "a" in the lock washer with a rib "b" on the clutch boss.
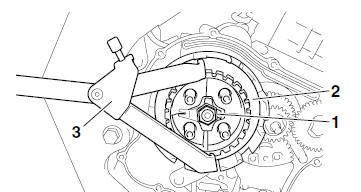
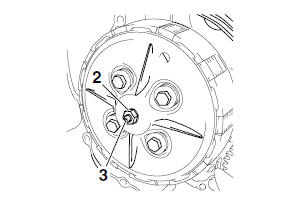
4. Tighten:
- Clutch boss nut "1"

NOTE:
While holding the clutch boss "2" with the universal
clutch holder "3", tighten the clutch boss nut.
5. Bend the lock washer tab along a flat side of the nut.
6. Lubricate:
- Friction plates
- Clutch plates
(with the recommended lubricant)

7. Install:
- Clutch damper spring seat "1"
- Clutch damper spring "2"
- Friction plate 2
- Clutch plates
- Friction plates 3
- Friction plate 1
NOTE:
- Install the clutch damper spring seat and clutch damper spring as shown in the illustration.
- First, install a friction plate and then alternate between a clutch plate and a friction plate.
8. Install:
- Pressure plate
- Clutch springs
- Clutch spring bolts "1"
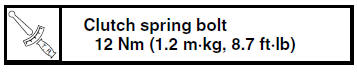
NOTE:
Tighten the clutch spring bolts in stages and in a crisscross pattern.
9. Adjust:
- Clutch mechanism free play
a. Check that projection "a" on the clutch push lever "1" aligns with mark "b" shown on the crankcase in the illustration by pushing the clutch push lever manually in direction "c" until it stops.
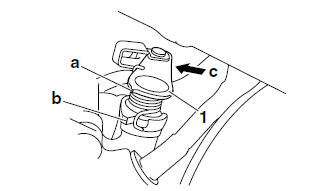
b. If projection "a" is not aligned with mark "b", align them as follows:
- Loosen the locknut "2".
- With the clutch push lever fully pushed in direction "c", turn the short clutch push rod "3" in or out until projection "a" aligns with mark "b".
- Hold the short clutch push rod to prevent it
from moving and then tighten the locknut to
specification.

10.Install:
- Oil seal "1"

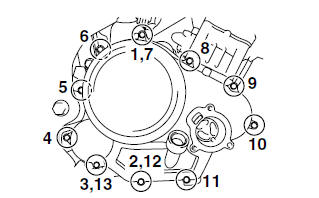
11.Install:
- Clutch cover

NOTE:
Tighten the clutch cover bolts in the proper tightening sequence as shown.
12.Adjust:
- Clutch cable free play Refer to "ADJUSTING THE CLUTCH CABLE FREE PLAY" on page 3-12.
 Checking the primary driven gear
1. Check:
Primary driven gear "1"
Damage/wear Replace the
primary drive
gear and clutch housing as a set.
Excessive noise during operation
Replace
the primary drive gear and ...
 Oil pump
...
Other materials:
Replacing the front brake pads
NOTE:
When replacing the brake pads, it is not necessary
to disconnect the brake hose or disassemble
the brake caliper.
1. Measure:
Brake pad wear limit "a"
Out of specification Replace
the brake
pads as a set.
2. Install:
Brake pad support
Brake pad spring
Brake pads ...
Checking and lubricating the brake and shift pedals
Brake pedal
Brake pedal
Shift pedal
Shift pedal
The operation of the brake and shift
pedals should be checked before each
ride, and the pedal pivots should be lubricated
if necessary.
Recommended lubricant:Lithium-soap-based grease
...
Installing the crankshaft
1. Install:
Crankshaft "1"
NOTE:
Install the crankshaft with the crankshaft installer
pot "2", crankshaft installer bolt "3", adapter
(M12) "4" and spacer (crankshaft installer) "5".
CAUTION:To avoid scratching the crankshaft and to
ease the installation procedure, lubricate ...