Yamaha YZF-R125 Service Manual: Adjusting the rear disc brake
1. Check:
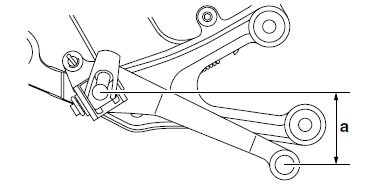
- Brake pedal position
(distance "a" from the center of the rider footrest
to the center of the brake pedal)
Out of specification
 Adjust.
2. Adjust:
- Brake pedal position
a. Loosen the locknut "1".
b. Remove the cotter pin "2", washer "3", and pin "4".
c. Turn the adjusting nut "5" in direction "a" or "b"
until the specified brake pedal position is obtained.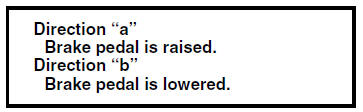
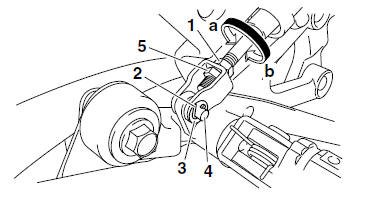
d. Tighten the locknut "1" to specification.
| WARNING A soft or spongy feeling in the brake pedal can indicate the presence of air in the brake system. Before the vehicle is operated, the air must be removed by bleeding the brake system. Air in the brake system will considerably reduce braking performance. |
| CAUTION: After adjusting the brake pedal position, make sure there is no brake drag. |
e. Install the pin, washer, and cotter pin.
| WARNING Always use a new cotter pin. |
 Chassis
...
 Checking the brake fluid level
1. Stand the vehicle on a level surface.
NOTE:
Place the vehicle on a suitable stand.
Make sure the vehicle is upright.
2. Check:
Brake fluid level
Below the minimum level mark "a" → ...
Other materials:
Adjusting the throttle cable free play
Throttle cable free play
The throttle cable free play should measure
3.0-5.0 mm (0.12-0.20 in) at the
throttle grip. Periodically check the
throttle cable free play and, if necessary,
adjust it as follows.
TIP
The engine idling speed must be correctly
adjusted before checkin ...
Checking the rear wheel
1. Check:
Rear wheel axle
Rear wheel
Wheel bearings
Oil seals
Refer to "CHECKING THE FRONT WHEEL"
on page 4-8.
2. Check:
Tire
Rear wheel
Damage/wear → Replace.
Refer to "CHECKING THE TIRES" on page
3-23 and "CHECKING THE WHEELS" on
page 3-25.
3. Measure:
Radi ...
Checking and charging the battery
WARNINGBatteries generate explosive hydrogen gas
and contain electrolyte which is made of poisonous
and highly caustic sulfuric acid.
Therefore, always follow these preventive
measures:
Wear protective eye gear when handling or
working near batteries.
Charge batt ...