Yamaha YZF-R125 Service Manual: Checking the drive sprocket
1. Check:
- Drive sprocket
More than 1/4 tooth "a" wear

Replace the drive chain sprockets as a set.Bent teeth
 Replace the drive
chain sprockets as a set.
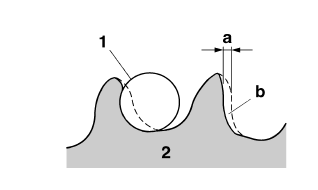
b. Correct
1. Drive chain roller
2. Drive chain sprocket
Checking the rear wheel sprocket
Refer to "CHECKING AND REPLACING THE REAR WHEEL SPROCKET" on page 4-15.
Checking the rear wheel drive hub
Refer to "CHECKING THE REAR WHEEL DRIVE HUB" on page 4-15.
 Checking the drive chain
1. Measure:
15-link section "a" of the drive chain
Out of specification Replace the drive
chain.
a. Measure the length "a" between the inner
sides of the pins and the length "b" between
t ...
 Installing the drive chain
1. Lubricate:
Drive chain
Master link
2. Install:
Drive sprocket
Drive sprocket retainer bolts
3. Install:
Master link
O-rings
Master link plate
Master link clip "1"
...
Other materials:
Electrical components
1. Main switch
2. Clutch switch
3. Front brake light switch
4. Ignition coil
5. Throttle body sensor assembly (intake air
pressure sensor, intake air temperature
sensor, throttle position sensor)
6. FID (fast idle solenoid)
7. Rectifier/regulator
8. Lean angle sensor
9. Starting circui ...
Measuring the compression pressure
NOTE:
Insufficient compression pressure will result in a
loss of performance.
1. Measure:
Valve clearance
Out of specification →Adjust.
Refer to "ADJUSTING THE VALVE CLEARANCE"
on page 3-3.
2. Start the engine, warm it up for several minutes,
and then turn it off.
3. Remove:
...
Disassembling the water pump
1. Remove:
Water pump seal "1"
NOTE:
Remove the water pump seal from the inside of
the water pump housing "2".
2. Remove:
Bearing "1"
NOTE:
Remove the bearing from the outside of the water
pump housing "2".
...