
Yamaha YZF-R125 Service Manual: Circlips
Before reassembly, check all circlips carefully and replace damaged or distorted circlips. Always replace piston pin clips after one use.
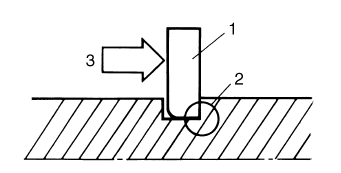
When installing a circlip "1", make sure the sharp-edged corner "2" is positioned opposite the thrust "3" that the circlip receives.
 Bearings and oil seals
Install bearings "1" and oil seals "2" so that the
manufacturer's marks or numbers are visible.
When installing oil seals "1", lubricate the oil seal
lips with a light coat of lithium-soap-based
...
 Checking the connections
Check the leads, couplers, and connectors for
stains, rust, moisture, etc.
1. Disconnect:
Lead
Coupler
Connector
2. Check:
Lead
Coupler
Connector
Moisture → Dry with an ...
Other materials:
Checking the clutch boss
1. Check:
Clutch boss splines
Damage/pitting/wear Replace the
clutch
boss.
NOTE:
Pitting on the clutch boss splines will cause erratic
clutch operation.
Checking the pressure plate
1. Check:
Pressure plate
Cracks/damage Replace.
Checking the clutch push lever and short clutch push ...
Assembling the rear brake caliper
WARNING
Before installation, all internal brake components
should be cleaned and lubricated
with clean or new brake fluid.
Never use solvents on internal brake components
as they will cause the brake caliper
piston dust seal and piston seal to swell
and distort.
...
Clutch lever
Clutch lever
Clutch lever
The clutch lever is located at the left
handlebar grip. To disengage the
clutch, pull the lever toward the handlebar
grip. To engage the clutch, release
the lever. The lever should be pulled
rapidly and released slowly for smooth
clutch operation.
Th ...