Yamaha YZF-R125 Service Manual: Bearings and oil seals
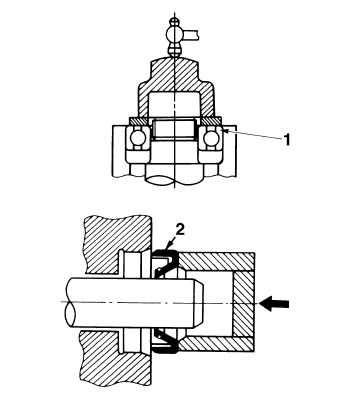
Install bearings "1" and oil seals "2" so that the manufacturer's marks or numbers are visible.
When installing oil seals "1", lubricate the oil seal lips with a light coat of lithium-soap-based grease. Oil bearings liberally when installing, if appropriate.
| CAUTION: Do not spin the bearing with compressed air because this will damage the bearing surfaces. |
 Lock washers/plates and cotter pins
After removal, replace all lock washers/plates
"1" and cotter pins. After the bolt or nut has been
tightened to specification, bend the lock tabs
along a flat of the bolt or nut.
...
 Circlips
Before reassembly, check all circlips carefully
and replace damaged or distorted circlips. Always
replace piston pin clips after one use.
When installing a circlip "1", make sure the
sharp-edged ...
Other materials:
Installing the front fork legs
The following procedure applies to both of the
front fork legs.
1. Install:
Front fork leg
Temporarily tighten the upper and lower
bracket pinch bolts.
NOTE:
Make sure the inner tube end position "a" is 24.5
mm (0.96 in) from the top of the upper bracket.
2. Tighten:
Lower br ...
Adjusting the front wheel static balance
NOTE:
After replacing the tire, wheel or both, the front
wheel static balance should be adjusted.
Adjust the front wheel static balance with the
brake discs installed.
1. Remove:
Balancing weight(s)
2. Find:
Front wheel's heavy spot
NOTE:
Place the front wheel on a suitab ...
Assembling the water pump
1. Install:
Water pump seal "1"
(into the water pump housing "2")
CAUTION:Never lubricate the water pump seal
surface
with oil or grease.
NOTE:
Install the water pump seal with the special
tools.
Install the water pump seal with the special
tools to the specifi ...