Yamaha YZF-R125 Service Manual: Checking the valve springs
The following procedure applies to all of the valve springs.
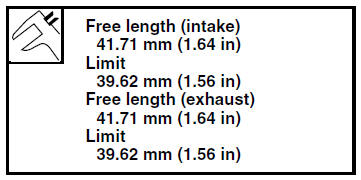
1. Measure:
- Valve spring free length "a"
Out of specification Replace the valve
spring.
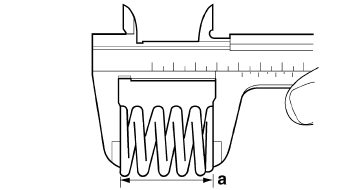
2. Measure:
- Compressed valve spring force "a"
Out of specification Replace the valve
spring.
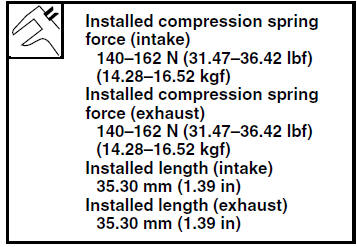
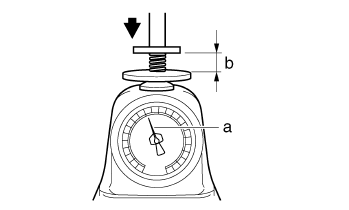
b. Installed length
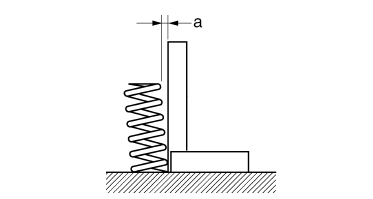
3. Measure:
- Valve spring tilt "a"
Out of specification
 Replace the
valve spring.
 Checking the valve seats
The following procedure applies to all of the
valves and valve seats.
1. Eliminate:
Carbon deposits
(from the valve face and valve seat)
2. Check:
Valve seat
Pitting/wear Replace the ...
 Installing the valves
The following procedure applies to all of the
valves and related components.
1. Deburr:
Valve stem end
(with an oil stone)
2. Lubricate:
Valve stem "1"
Valve stem seal "2"
(with ...
Other materials:
Parking
When parking, stop the engine, and
then remove the key from the main
switch.
WARNING
Since the engine and exhaust
system can become very hot,
park in a place where pedestrians
or children are not likely to
touch them and be burned.
Do not park on a slope or on soft
ground, ...
Installing the fuel hose
1. Install:
Fuel hose
Fuel hose connector cover
CAUTION:When installing the fuel hose, make sure
that
it is securely connected, and that the fuel
hose connector cover is in the correct position,
otherwise the fuel hose will not be properly
installed.
NOTE:
W ...
Installing the front wheel (disc)
1. Install:
Front brake disc
NOTE:
Be sure to install the front brake disc with the
arrow mark "a" on the disc facing out.
Tighten the brake disc bolts in stages and in a
crisscross pattern.
2. Check:
Front brake disc
Refer to "CHECKING THE FRONT BRAKE
DISC" on page 4 ...