
Yamaha YZF-R125 Service Manual: Checking the front fork legs
The following procedure applies to both of the front fork legs.
1. Check:
- Inner tube
- Outer tube
Bends/damage/scratches

Replace.
| WARNING Do not attempt to straighten a bent inner tube as this may dangerously weaken it. |
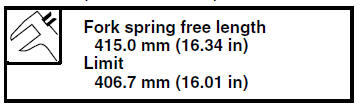
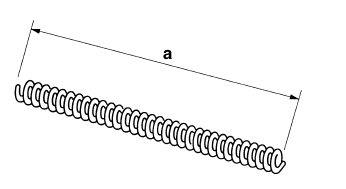
2. Measure:
- Spring free length "a"
Out of specification
 Replace.
3. Check:
- Damper rod
Damage/wear
 Replace.
Obstruction
 Blow out all
of the oil passages with compressed air. - Oil flow stopper
Damage
 Replace.
| CAUTION: When disassembling and assembling the front fork leg, do not allow any foreign material to enter the front fork. |
 Disassembling the front fork legs
The following procedure applies to both of the
front fork legs.
1. Remove:
Rubber cap
Clip "1"
Front fork cap "2"
(with O-ring)
Fork spring
NOTE:
Push the front fork cap in the direc ...
 Assembling the front fork legs
The following procedure applies to both of the
front fork legs.
WARNING
Make sure the oil levels in both front fork
legs are equal.
Uneven oil levels can result in poor handling
...
Other materials:
General tightening torque specifications
This chart specifies tightening torques for standard
fasteners with a standard ISO thread pitch.
Tightening torque specifications for special components
or assemblies are provided for each
chapter of this manual. To avoid warpage, tighten
multi-fastener assemblies in a crisscross pattern
and ...
Checking the swingarm
1. Check:
Swingarm
Bends/cracks/damage
Replace.
2. Check:
Pivot shaft
Roll the pivot shaft on a flat surface.
Bends Replace.
WARNINGDo not attempt to straighten a bent pivot
shaft.
3. Wash:
Pivot shaft
Washer
Swingarm adjusting collar
Du ...
Replacing an auxiliary light bulb
This model is equipped with two auxiliary
lights. If an auxiliary light bulb burns
out, replace it as follows.
Remove the socket (together with
the bulb) by pulling it out.
Auxiliary light bulb
Remove the burnt out bulb by pulling
it out.
Insert a new bulb into t ...