
Yamaha YZF-R125 Service Manual: Checking the friction plates
The following procedure applies to all of the friction plates.
1. Check:
- Friction plate
Damage/wear
 Replace the
friction plates as a set.
2. Measure:
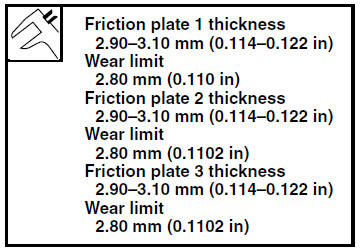
- Friction plate thickness
Out of specification
 Replace
the friction plates as a set.
NOTE:
Measure the friction plate at four places.
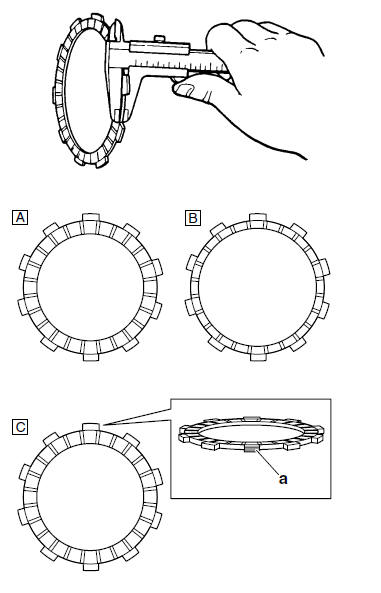
A. Friction plate 1
B. Friction plate 2
C. Friction plate 3 (Green)
a. Green paint
 Removing the clutch
1. Straighten the lock washer tab.
2. Loosen:
Clutch boss nut "1"
NOTE:
While holding the clutch boss "2" with the universal
clutch holder "3", loosen the clutch boss nut.
...
 Checking the clutch plates
The following procedure applies to all of the
clutch plates.
1. Check:
Clutch plate
Damage Replace the clutch
plates as a
set.
2. Measure:
Clutch plate warpage
(with a surface p ...
Other materials:
Checking the fuel sender
1. Drain the fuel from the fuel tank.
2. Check:
Fuel sender resistance
Out of specification → Replace the fuel
sender.
a. Connect the pocket tester ( ×
10) to the fuel
sender coupler as shown.
Positive tester probe
sky blue "1"
Negative tester probe
orange/white " ...
Installing the swingarm
1. Lubricate:
Bearings
Spacers
Dust covers
Pivot shaft
2. Install:
Bearings "1"
2. Swingarm
A. Left side
B. Right side
3. Install:
Swingarm adjusting collar "1"
Swingarm "2"
Pivot shaft
Pivot shaft nut "3"
a. Install, and then fully turn in the swingarm adju ...
Installing the front brake caliper
1. Install:
Brake caliper "1"
(temporarily)
Copper washers "2"
Brake hose "3"
Brake hose union bolt "4"
WARNINGProper brake hose routing is essential to
insure
safe vehicle operation. Refer to "CABLE
ROUTING" on page 2-33.
CAUTION:
Install the brake ...