Yamaha YZF-R125 Owners Manual: Engine oil and oil filter element
The engine oil level should be checked before each ride. In addition, the oil must be changed and the oil filter element replaced at the intervals specified in the periodic maintenance and lubrication chart.
To check the engine oil level
- Place the vehicle on a level surface and hold it in an upright position. A slight tilt to the side can result in a false reading.
- Start the engine, warm it up for several minutes, and then turn it off.
- Wait a few minutes until the oil settles, remove the oil filler cap, wipe the dipstick clean, insert it back into the oil filler hole (without screwing it in), and then remove it again to check the oil level. NOTICE: Do not operate the vehicle until you know that the engine oil level is sufficient.
TIP
The engine oil should be between the
minimum and maximum level marks.
-
Engine oil filler cap

-
Dipstick
-
Maximum level mark
-
Minimum level mark
- If the engine oil is below the minimum level mark, add sufficient oil of the recommended type to raise it to the correct level.
- Install the oil filler cap.
To change the engine oil (with or without oil filter element replacement)
- Remove cowling D.
- Start the engine, warm it up forseveral minutes, and then turn itoff.
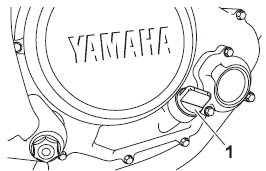
- Install the engine oil drain attachment,provided with the owner'stool kit, under the drain bolt of thecrankcase.
-
Engine oil drain bolt (crankcase)
-
Engine oil drain attachment
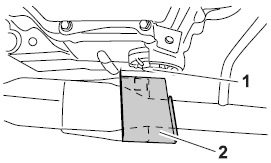
- 4. Place an oil pan under the engine to collect the used oil.
- Remove the engine oil filler cap and the drain bolt along with the Oring, compression spring, and engine oil strainer, to drain the oil from the crankcase. NOTICE: When removing the engine oil drain bolt, the O-ring, compression spring, and oil strainer will fall out. Take care not to lose these parts.
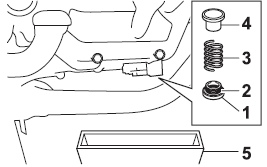
-
Engine oil drain bolt
-
O-ring
-
Compression spring
-
Strainer
-
Oil pan
- Clean the engine oil strainer with 6 solvent.
TIP Skip steps 7-9 if the oil filter element is not being replaced.
- Remove the oil filter element coverby removing the bolts.
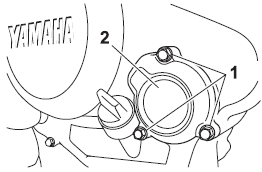
-
Bolt
-
Oil filter element cover
- Remove and replace the oil filter element and O-ring.
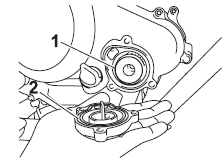
-
Oil filter element
-
O-ring
- Install the oil filter element cover by installing the bolts, then tightening them to the specified torque.
| Tightening torques: Oil filter element cover bolt: 10 Nm (1.0 m.kgf, 7.2 ft.lbf) |
TIP Make sure that the O-ring is properly seated.
- Install the engine oil strainer, compression spring, O-ring and the engine oil drain bolt, and then tighten it to the specified torque. NOTICE: Before installing the engine oil drain bolt, do not forget to install the O-ring, compression spring, and oil strainer in position.
| Tightening torques: Engine oil drain bolt: 32 Nm (3.2 m.kgf, 23 ft.lbf) |
- Refill with the specified amount of the recommended engine oil, and then install and tighten the oil filler cap.
| Oil quantity: Without oil filter element replacement: 0.95 L (1.00 US qt, 0.84 Imp.qt) With oil filter element replacement: 1.00 L (1.06 US qt, 0.88 Imp.qt) |
NOTICE
- In order to prevent clutch slippage (since the engine oil also lubricates the clutch), do not mix any chemical additives. Do not use oils with a diesel specification of "CD" or oils of a higher quality than specified. In addition, do not use oils labeled "ENERGY CONSERVING II" or higher.
- Make sure that no foreign material enters the crankcase.
- Start the engine, and then let it idle for several minutes while checking it for oil leakage. If oil is leaking, immediately turn the engine off and check for the cause.
- Turn the engine off, and then check the oil level and correct it if necessary.
 Checking the spark plug
The spark plug is an important engine
component, which is easy to check.
Since heat and deposits will cause any
spark plug to slowly erode, the spark
plug should be removed and checked
in ac ...
 Coolant
The coolant level should be checked
before each ride. In addition, the coolant
must be changed at the intervals
specified in the periodic maintenance
and lubrication chart.
To check the coola ...
Other materials:
Checking the front fork
1. Stand the vehicle on a level surface.
WARNINGSecurely support the vehicle so that there
is
no danger of it falling over.
2. Check:
Inner tube
Damage/scratches Replace.
Oil seal
Oil leakage Replace.
3. Hold the vehicle upright and apply the front
brake.
4. Che ...
Sidestand
The sidestand is located on the left side
of the frame. Raise the sidestand or
lower it with your foot while holding the
vehicle upright.
TIP
The built-in sidestand switch is part of
the ignition circuit cut-off system, which
cuts the ignition in certain situations.
WARNING
The vehicl ...
Fuel tank cap
Fuel tank cap
Fuel tank cap lock cover
Unlock.
To remove the fuel tank cap
Open the fuel tank cap lock cover.
Insert the key into the lock and turn
it 1/4 turn counterclockwise. The
lock will be released and the fuel
tank cap can be removed.
To install the fuel tank ca ...