Yamaha YZF-R125 Service Manual: Changing the engine oil
1. Remove:
- Right bottom cowling
- Right upper side cowling
- Right lower side cowling Refer to "GENERAL CHASSIS" on page 4-1.
2. Start the engine, warm it up for several minutes, and then turn it off.
3. Place a container under the engine oil drain bolt.
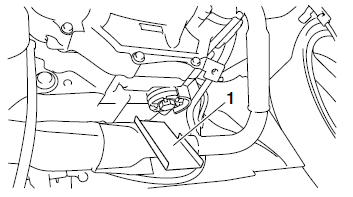
4. Install:
- Engine oil drain attachment "1" (Located under the rider seat with the owner's tool kit)
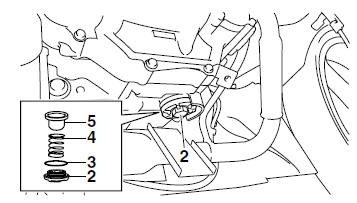
5. Remove:
- Engine oil filler cap (dipstick) "1"
- Engine oil drain plug "2"
- O-ring "3"
- Spring "4"
- Engine oil strainer "5"
6. Drain:
- Engine oil (completely from the crankcase)
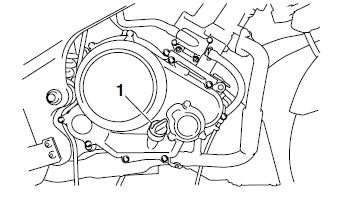
7. If the oil filter element is also to be replaced, perform the following procedure.
a. Remove the oil filter element cover "1" and oil filter element "2".
b. Install the new O-ring "3".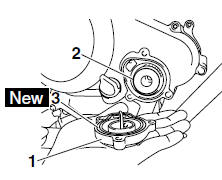
c. Install the new oil filter element and the oil filter
element cover.
8. Check:
- Engine oil strainer
Dirt
 Clean.
9. Install:
- Engine oil strainer
- Spring
- O-ring

- Engine oil drain plug

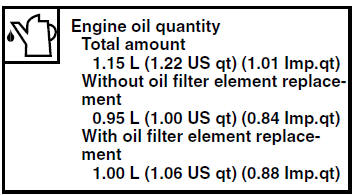
10.Fill:
- Crankcase (with the specified amount of the recommended engine oil)
11.Install:
- Engine oil filler cap
12.Start the engine, warm it up for several minutes, and then turn it off.
13.Check:
- Engine (for engine oil leaks)
14.Check:
- Engine oil level Refer to "CHECKING THE ENGINE OIL LEVEL" on page 3-10.
15.Check:
- Engine oil pressure
a. Slightly loosen the oil check bolt "1".
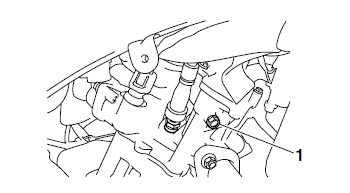
b. Start the engine and keep it idling until engine oil starts to seep from the oil check bolt. If no engine oil comes out after one minute, turn the engine off so that it will not seize.
c. Check the engine oil passages, the oil filter element and the oil pump for damage or leakage.
Refer to "OIL PUMP" on page 5-47.
d. Start the engine after solving the problem(s) and check the engine oil pressure again.
e. Tighten the oil check bolt to specification.

16.Install:
- Right lower side cowling
- Right upper side cowling
- Right bottom side cowling Refer to "GENERAL CHASSIS" on page 4-1.
 Checking the engine oil level
1. Stand the vehicle on a level surface.
NOTE:
Place the vehicle on a suitable stand.
Make sure the vehicle is upright.
2. Start the engine, warm it up for several minutes,
and then turn it ...
 Adjusting the clutch cable free play
1. Check:
Clutch cable free play "a"
Out of specification Adjust.
2. Adjust:
Clutch cable free play
a. Pull back the rubber cover "1"
b. Loosen the locknut "2".
c. Turn the adjust ...
Other materials:
Replacing the fuses
Replacing the fuses
Fuse box
Spare fuse
Headlight fuse
Signaling system fuse
Ignition fuse
Radiator fan fuse
Main fuse
The fuse box is located under the rider
seat.
If a fuse is blown, replace it as follows.
Turn the key to "OFF" and turn off
the electrical circuit i ...
Installing the front brake master cylinder
1. Install:
Brake master cylinder "1"
Brake master cylinder holder "2"
NOTE:
Install the brake master cylinder holder with the
arrow mark "a" pointing forward.
Align the end of the brake master cylinder holder
with the punch mark "b" on the handlebar.
First, tighten the front bo ...
Checking the brake fluid level
1. Stand the vehicle on a level surface.
NOTE:
Place the vehicle on a suitable stand.
Make sure the vehicle is upright.
2. Check:
Brake fluid level
Below the minimum level mark "a" → Add the
recommended brake fluid to the proper level.
A. Front brake
B. Rear brake
WA ...