Yamaha YZF-R125 Service Manual: Removing the piston
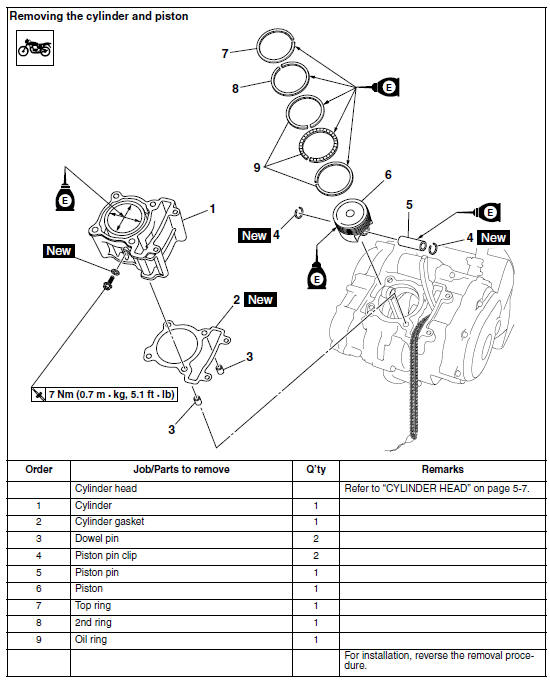
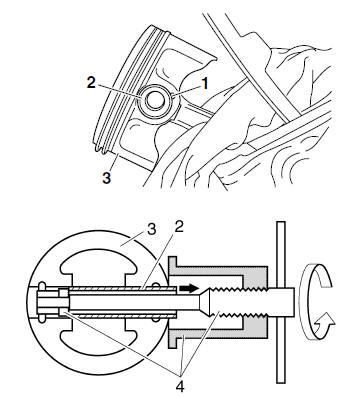
1. Remove:
-
Piston pin clips "1"
-
Piston pin "2"
-
Piston "3"
| CAUTION: Do not use a hammer to drive the piston pin out. |
NOTE:
-
Before removing the piston pin clip, cover the crankcase opening with a clean rag to prevent the piston pin clip from falling into the crankcase.
-
Before removing the piston pin, deburr the piston pin clip groove and the piston pin bore area.
If both areas are deburred and the piston pin is still difficult to remove, remove it with the piston pin puller set "4".

2. Remove:
-
Top ring
-
2nd ring
-
Oil ring
NOTE:
When removing a piston ring, open the end gap with your fingers and lift the other side of the ring over the piston crown.

 Checking the cylinder and piston
1. Check:
Piston wall
Cylinder wall
Vertical scratches Replace the
cylinder,
and replace the piston and piston rings as a
set.
2. Measure:
Piston-to-cylinder clearance
a. Mea ...
Other materials:
Supporting the motorcycle
Since this model is not equipped with a
centerstand, follow these precautions
when removing the front and rear
wheel or performing other maintenance
requiring the motorcycle to stand upright.
Check that the motorcycle is in a
stable and level position before starting
any maintenance. A ...
Checking the diode
1. Check:
Diode
Out of specification Replace.
NOTE:
The pocket tester or the analog pocket tester
readings are shown in the following table.
a. Disconnect the diode from the wire harness.
b. Connect the pocket tester ( × 1)
to the diode
terminals as shown.
c. Check the diod ...
Installing the camshaft and rocker arms
1. Lubricate:
Rocker arms
Rocker arm shafts
2. Lubricate:
Camshaft
3. Install:
Camshaft "1"
NOTE:
Make sure that the camshaft projections "a" and
hole "b" are positioned as shown in the illustration.
4. Install:
Rocker arms
Rocker arm shafts "1"
NOTE:
Make ...