Yamaha YZF-R125 Service Manual: Installing the water pump
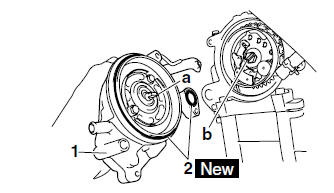
1. Install:
- Water pump assembly "1"
- O-rings "2"

NOTE:
- Align the projection "a" on the impeller shaft with the slit "b" on the camshaft sprocket bolt.
- Lubricate the O-rings with a thin coat of lithiumsoap- based grease.
2. Fill:
- Cooling system (with the specified amount of the recommended coolant)
Refer to "CHANGING THE COOLANT" on page 3-15.
3. Check:
Cooling system
Leaks  Repair or replace the faulty
part.
4. Measure:
Radiator cap opening pressure
Below the specified pressure
Replace the
radiator cap.
Refer to "CHECKING THE RADIATOR" on page 6-3.
 Assembling the water pump
1. Install:
Water pump seal "1"
(into the water pump housing "2")
CAUTION:Never lubricate the water pump seal
surface
with oil or grease.
NOTE:
Install the water pump ...
 Fuel system
...
Other materials:
Checking the front wheel
1. Check:
Front wheel axle
Roll the wheel axle on a flat surface.
Bends → Replace.
WARNINGDo not attempt to straighten a bent wheel
axle.
2. Check:
Tire
Front wheel
Damage/wear → Replace.
Refer to "CHECKING THE TIRES" on page
3-23 and "CHECKING TH ...
Assembling the front brake caliper
WARNING
Before installation, all internal brake components
should be cleaned and lubricated
with clean or new brake fluid.
Never use solvents on internal brake components
as they will cause the brake caliper
dust seals and piston seals to swell and
distort.
...
Checking the ignition spark gap
1. Check:
Ignition spark gap
Out of specification Perform the
ignition
system troubleshooting, starting with step 5.
Refer to "TROUBLESHOOTING" on page
8-3.
NOTE:
If the ignition spark gap is within specification,
the ignition system circuit is operating normally.
a. Disconnect the spa ...