Yamaha YZF-R125 Service Manual: Installing the shift forks and shift drum assembly
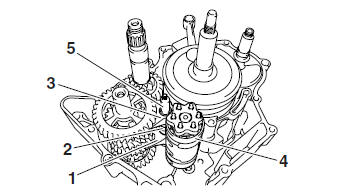
1. Install:
- Shift fork-L "1"
- Shift fork-C "2"
- Shift fork-R "3"
- Shift drum assembly "4"
- Springs
- Shift fork guide bar "5"
NOTE:
The embossed marks on the shift forks should face towards the right side of the engine and be in the following sequence: "R", "C", "L".
2. Check:
Transmission
Rough movement  Repair.
NOTE:
- Apply engine oil to each gear and bearing thoroughly.
- Before assembling the crankcase, make sure that the transmission is in neutral and that the gears turn freely.

 Assembling the main axle and drive axle
1. Install:
Toothed washer "1"
Circlip "2"
NOTE:
Be sure to install the circlip so that its sharp
edge "a" is facing away from the toothed washer
and gear.
Be sure the circlip ends ...
 Cooling system
...
Other materials:
Installing the engine
1. Install:
Engine "1"
Engine mounting bolt (rear lower side) "2"
Engine mounting nut (rear lower side) "3"
Engine mounting bolt (rear upper side) "4"
Engine mounting nut (rear upper side) "5"
Engine mounting bolt (front side) "6"
Engine mounting nut (front side) "7"
NOTE:
Do not ...
Starting the engine
In order for the ignition circuit cut-off
system to enable starting, one of the
following conditions must be met:
The transmission is in the neutral
position.
The transmission is in gear with
the clutch lever pulled and the sidestand
up.
1. Turn the key to "ON" and make
sure ...
Checking the rear brake caliper
1. Check:
Brake caliper piston "1"
Rust/scratches/wear Replace the
brake
caliper piston.
Brake caliper cylinder "2"
Scratches/wear Replace the
brake caliper
assembly.
Brake caliper body "3"
Cracks/damage Replace the
brake caliper
assembly.
Brake fluid deli ...