Yamaha YZF-R125 Service Manual: Installing the rear brake caliper
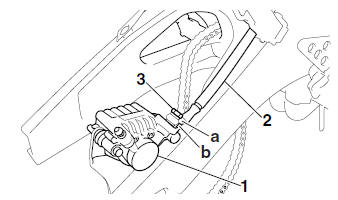
1. Install:
- Brake caliper "1"

- Copper washers
- Brake hose "2"
- Union bolt "3"

| WARNING Proper brake hose routing is essential to insure safe vehicle operation. Refer to "CABLE ROUTING" on page 2-33. |
| CAUTION: When installing the brake hose onto the brake caliper, be sure to position the brake pipe "a" into the slot "b" in the brake caliper. |
2. Install:
- Brake pad spring
- Brake pads
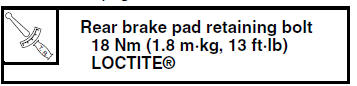
- Brake pad retaining bolts
- Rear brake caliper
Refer to "REPLACING THE REAR BRAKE
PADS" on page 4-33.
3. Install:
- Rear wheel Refer to "REAR WHEEL" on page 4-12.
4. Fill:
- Brake fluid reservoir
(with the specified amount of the recommended
brake fluid)

WARNING
|
| CAUTION: Brake fluid may damage painted surfaces and plastic parts. Therefore, always clean up any spilt brake fluid immediately. |
5. Bleed:
- Brake system Refer to "BLEEDING THE HYDRAULIC BRAKE SYSTEM" on page 3-20.
6. Check:
- Brake fluid level
Below the minimum level mark "a"

Add the recommended brake fluid to the proper level.Refer to "CHECKING THE BRAKE FLUID LEVEL" on page 3-18.
7. Check:
- Brake pedal operation
Soft or spongy feeling
 Bleed
Bleed
the brake system.Refer to "BLEEDING THE HYDRAULIC BRAKE SYSTEM" on page 3-20.
 Assembling the rear brake caliper
WARNING
Before installation, all internal brake components
should be cleaned and lubricated
with clean or new brake fluid.
Never use solvents on internal brake components
as ...
 Removing the rear brake master cylinder
NOTE:
Before removing the rear brake master cylinder,
drain the brake fluid from the entire brake system.
1. Disconnect:
Rear brake light switch coupler
2. Loosen:
Rear brake light switc ...
Other materials:
Checking the ignition spark gap
1. Check:
Ignition spark gap
Out of specification Perform the
ignition
system troubleshooting, starting with step 5.
Refer to "TROUBLESHOOTING" on page
8-3.
NOTE:
If the ignition spark gap is within specification,
the ignition system circuit is operating normally.
a. Disconnect the spa ...
Storage
Short-term
Always store your motorcycle in a cool,
dry place and, if necessary, protect it
against dust with a porous cover.
NOTICE
Storing the motorcycle in a
poorly ventilated room or covering
it with a tarp, while it is still
wet, will allow water and humidity
to seep in and ...
Checking the crankshaft
1. Measure:
Crankshaft runout
Out of specification Replace
the crankshaft,
bearing or both.
NOTE:
Turn the crankshaft slowly.
2. Measure:
Big end side clearance
Out of specification Replace
the crankshaft.
3. Measure:
Crankshaft width
Out of specification&nbs ...