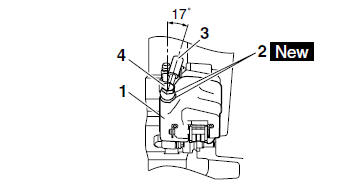
Yamaha YZF-R125 Service Manual: Installing the front brake caliper
1. Install:
- Brake caliper "1" (temporarily)
- Copper washers "2"

- Brake hose "3"
- Brake hose union bolt "4"

| WARNING Proper brake hose routing is essential to insure safe vehicle operation. Refer to "CABLE ROUTING" on page 2-33. |
CAUTION:
|
2. Remove:
- Brake caliper
3. Install:
- Brake pad spring
- Brake pads
- Brake caliper
- Brake hose holder
Refer to "REPLACING THE FRONT BRAKE PADS" on page 4-22.
4. Fill:
- Brake master cylinder reservoir
(with the specified amount of the recommended
brake fluid)

WARNING
|
| CAUTION: Brake fluid may damage painted surfaces and plastic parts. Therefore, always clean up any spilt brake fluid immediately. |
5. Bleed:
- Brake system Refer to "BLEEDING THE HYDRAULIC BRAKE SYSTEM" on page 3-20.
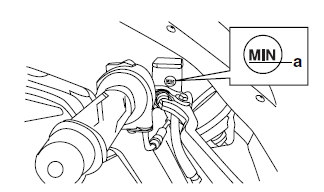
6. Check:
- Brake fluid level
Below the minimum level mark "a"

Add the recommended brake fluid to the proper level.Refer to "CHECKING THE BRAKE FLUID LEVEL" on page 3-18.
7. Check:
Brake lever operation Soft or spongy feeling → Bleed the brake system.
Refer to "BLEEDING THE HYDRAULIC BRAKE SYSTEM" on page 3-20.
 Assembling the front brake caliper
WARNING
Before installation, all internal brake components
should be cleaned and lubricated
with clean or new brake fluid.
Never use solvents on internal brake components
as ...
 Removing the front brake master cylinder
NOTE:
Before removing the front brake master cylinder,
drain the brake fluid from the entire brake system.
1. Disconnect:
Front brake light switch
2. Remove:
Brake hose union bolt
Copp ...
Other materials:
Checking and lubricating the brake and shift pedals
Brake pedal
Brake pedal
Shift pedal
Shift pedal
The operation of the brake and shift
pedals should be checked before each
ride, and the pedal pivots should be lubricated
if necessary.
Recommended lubricant:Lithium-soap-based grease
...
Removing the starter clutch
1. Remove:
Starter clutch bolts "1"
NOTE:
While holding the generator rotor "2" with the
sheave holder "3", remove the starter clutch
bolts.
Do not allow the sheave holder to touch the
projection on the generator rotor.
...
Checking the starter motor operation
1. Check:
Starter motor operation
Does not operate → Perform the electric
starting system troubleshooting, starting with
step 4.
Refer to "TROUBLESHOOTING" on page
8-9.
a. Connect the positive battery terminal "1" and
starter motor lead "2" with a jumper lead "3".
W ...