Yamaha YZF-R125 Service Manual: Checking the fuel line
1. Remove:
- Left side panel Refer to "GENERAL CHASSIS" on page 4-1.
2. Lift the fuel tank. (Do not disconnect the fuel hose, drain hose
3. Check:
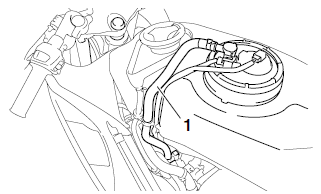
Fuel hose "1" Cracks/damage → Replace.
Loose connection Connect properly.
4. Install:
- Fuel tank Refer to "FUEL TANK" on page 7-1.
- Left side panel Refer to "GENERAL CHASSIS" on page 4-1.
 Checking the throttle body joint and air filter case joint
1. Remove:
Right lower side cowling
Left lower side cowling
Refer to "GENERAL CHASSIS" on page 4-1.
2. Check:
Throttle body joint "1"
Air filter case joint "2"
Cracks/damage Replace ...
 Checking the cylinder head breather hose
1. Remove:
Left side panel
Refer to "GENERAL CHASSIS" on page 4-1.
2. Check:
Cylinder head breather hose "1"
Cracks/damage → Replace.
Loose connection → Connect properly ...
Other materials:
Adjusting the throttle cable free play
NOTE:
Prior to adjusting the throttle cable free play, the
engine idling speed should be adjusted.
1. Check:
Throttle cable free play "a"
Out of specification →Adjust.
2. Remove:
Right side panel
Refer to "GENERAL CHASSIS" on page 4-1.
3. Adjust:
Throttle cable f ...
Checking the shift shaft
1. Check:
Shift shaft
Bends/damage/wear Replace.
Shift shaft spring
Damage/wear Replace.
Checking the stopper lever
1. Check:
Stopper lever
Bends/damage Replace.
Roller turns roughly Replace
the stopper
lever.
Stopper lever spring
Damage/wear Replace.
...
Assembling the front brake caliper
WARNING
Before installation, all internal brake components
should be cleaned and lubricated
with clean or new brake fluid.
Never use solvents on internal brake components
as they will cause the brake caliper
dust seals and piston seals to swell and
distort.
...