Yamaha YZF-R125 Service Manual: Checking the drive chain
1. Measure:
- 15-link section "a" of the drive chain
Out of specification Replace the drive
chain.

a. Measure the length "a" between the inner sides of the pins and the length "b" between the outer sides of the pins on a 15-link section of the drive chain as shown in the illustration.
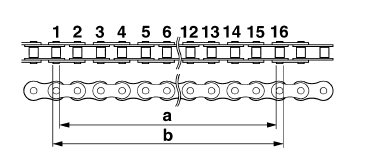
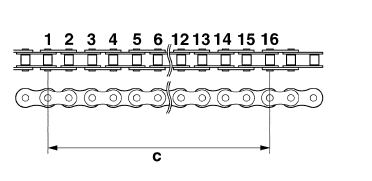
b. Calculate the length "c" of the 15-link section of the drive chain using the following formula.
Drive chain 15-link section length "c" = (length "a" between pin inner sides + length "b" between pin outer sides)/2
NOTE:
- When measuring a 15-link section of the drive chain, make sure that the drive chain is taut.
- Perform this procedure 2-3 times, at a different location each time.
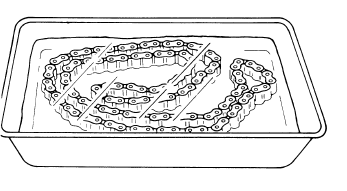
2. Clean:
- Drive chain
a. Wipe the drive chain with a clean cloth.
b. Put the drive chain in kerosene and remove any remaining dirt.
c. Remove the drive chain from the kerosene and completely dry it.
CAUTION:
|
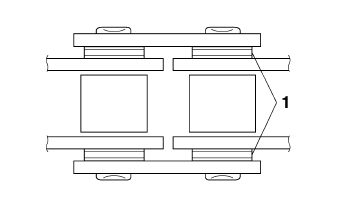
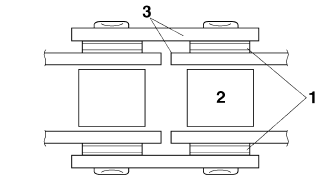
3. Check:
- O-rings "1"
Damage
 Replace the drive
chain. - Drive chain rollers "2"
Damage/wear
 Replace the
drive chain. - Drive chain side plates "3"
Damage/wear
 Replace the drive
chain.Cracks
 Replace the drive
chain.
4. Lubricate:
- Drive chain
 Chain drive
Removing the drive chain
1. Stand the vehicle on a level surface.
WARNINGSecurely support the vehicle so that there
is
no danger of it falling over.
NOTE:
Place the vehicle on ...
 Checking the drive sprocket
1. Check:
Drive sprocket
More than 1/4 tooth "a" wear
Replace the
drive chain sprockets as a set.
Bent teeth Replace the drive
chain sprockets
as a set.
b. Correct
1. Dri ...
Other materials:
Checking and lubricating the cables
The operation of all control cables and
the condition of the cables should be
checked before each ride, and the cables
and cable ends should be lubricated
if necessary. If a cable is damaged
or does not move smoothly, have a
Yamaha dealer check or replace it.
WARNING! Damage to the out ...
Checking the camshaft
1. Check:
Camshaft lobes
Blue discoloration/pitting/scratches
Replace
the camshaft.
2. Measure:
Camshaft lobe dimensions "a" and "b"
Out of specification Replace
the camshaft.
3. Check:
Camshaft oil passage
Obstruction Blow out with
compressed air. ...
Checking the thermostat
1. Check:
Thermostat
Does not open at 80.5-83.5 C (176.9-182.3
F) Replace.
a. Suspend the thermostat "1" in a container "2"
filled with water.
b. Slowly heat the water "3".
c. Place a thermometer "4" in the water.
d. While stirring the water, observe the thermostat
and th ...