Yamaha YZF-R125 Service Manual: Checking the condition of the bulb sockets

The following procedure applies to all of the bulb sockets.
1. Check:
Bulb socket (for continuity)
(with the pocket tester)
No continuity  Replace.
NOTE:
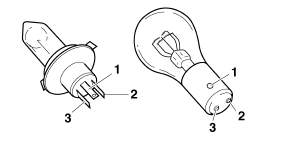
Check each bulb socket for continuity in the same manner as described in the bulb section, however, note the following.
a. Install a good bulb into the bulb socket.
b. Connect the pocket tester probes to the respective leads of the bulb socket.
c. Check the bulb socket for continuity. If any of the readings indicate no continuity, replace the bulb socket.
 Checking the condition of the bulbs
The following procedure applies to all of the
bulbs.
1. Remove:
Bulb
WARNINGSince the headlight bulbs get extremely
hot,
keep flammable products and your hands
away from them ...
 Checking the fuses
The following procedure applies to all of the fuses.
CAUTION:To avoid a short circuit, always turn the
main
switch to "OFF" when checking or replacing
a fuse.
1. Remove:
Ri ...
Other materials:
Checking the front fork
The condition and operation of the front
fork must be checked as follows at the
intervals specified in the periodic maintenance
and lubrication chart.
To check the condition
Check the inner tubes for scratches,
damage and excessive oil leakage.
To check the operation
Place the vehicle ...
Removing the cylinder head
1. Align:
"I" mark "a" on the generator rotor
(with the stationary pointer "b" on the generator
cover)
a. Turn the crankshaft counterclockwise.
b. When the piston is at TDC on the compression
stroke, align the "I" mark "c" on the camshaft
sprocket with the mark "d" on the
cylinder h ...
Checking the fid (fast idle solenoid)
1. Disconnect:
FID (fast idle solenoid) coupler
2. Check:
FID (fast idle solenoid) resistance
a. Disconnect the FID (fast idle solenoid) coupler
from the FID.
b. Connect the pocket tester ( × 10)
to the terminals
of the FID (fast idle solenoid).
Positive tester probe ...
