Yamaha YZF-R125 Service Manual: Installing the front brake caliper
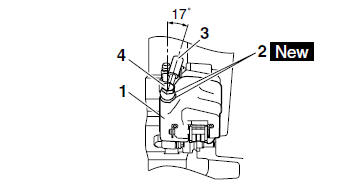
1. Install:
- Brake caliper "1" (temporarily)
- Copper washers "2"

- Brake hose "3"
- Brake hose union bolt "4"

| WARNING Proper brake hose routing is essential to insure safe vehicle operation. Refer to "CABLE ROUTING" on page 2-33. |
CAUTION:
|
2. Remove:
- Brake caliper
3. Install:
- Brake pad spring
- Brake pads
- Brake caliper
- Brake hose holder
Refer to "REPLACING THE FRONT BRAKE PADS" on page 4-22.
4. Fill:
- Brake master cylinder reservoir
(with the specified amount of the recommended
brake fluid)

WARNING
|
| CAUTION: Brake fluid may damage painted surfaces and plastic parts. Therefore, always clean up any spilt brake fluid immediately. |
5. Bleed:
- Brake system Refer to "BLEEDING THE HYDRAULIC BRAKE SYSTEM" on page 3-20.
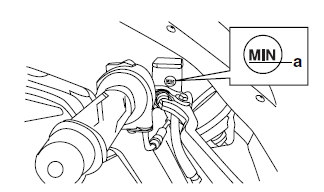
6. Check:
- Brake fluid level
Below the minimum level mark "a"

Add the recommended brake fluid to the proper level.Refer to "CHECKING THE BRAKE FLUID LEVEL" on page 3-18.
7. Check:
Brake lever operation Soft or spongy feeling → Bleed the brake system.
Refer to "BLEEDING THE HYDRAULIC BRAKE SYSTEM" on page 3-20.
 Assembling the front brake caliper
WARNING
Before installation, all internal brake components
should be cleaned and lubricated
with clean or new brake fluid.
Never use solvents on internal brake components
as ...
 Removing the front brake master cylinder
NOTE:
Before removing the front brake master cylinder,
drain the brake fluid from the entire brake system.
1. Disconnect:
Front brake light switch
2. Remove:
Brake hose union bolt
Copp ...
Other materials:
Cleaning the air filter element
NOTE:
There is a check hose "1" at the bottom of the air
filter case. If dust and/or water collects in this
hose, clean the air filter element and air filter
case.
1. Remove:
Rider seat
Refer to "GENERAL CHASSIS" on page 4-1.
2. Remove:
Fuel tank
Refer to "FUEL TANK" on page ...
Checking the switches
1. Clutch switch
2. Main switch
3. Front brake light switch
4. Sidestand switch
5. Rear brake light switch
6. Neutral switch
7. Turn signal switch
8. Horn switch
9. Dimmer switch
10.Pass switch
11.Engine stop switch
12.Start switch
Check each switch for continuity with the pocket tes ...
Installing the valves
The following procedure applies to all of the
valves and related components.
1. Deburr:
Valve stem end
(with an oil stone)
2. Lubricate:
Valve stem "1"
Valve stem seal "2"
(with the recommended lubricant)
3. Install:
Lower spring seat "1"
Valve stem seal "2"
V ...