
Yamaha YZF-R125 Service Manual: Checking the front brake pads
The following procedure applies to all of the brake pads.
1. Operate the brake.
2. Check:
- Front brake pad
Wear indicator grooves "a" have almost disappeared

Replace the brake pads as a set.Refer to "FRONT BRAKE" on page 4-17.
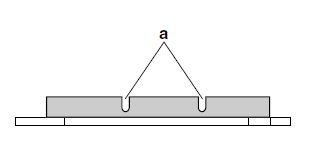
 Checking the brake fluid level
1. Stand the vehicle on a level surface.
NOTE:
Place the vehicle on a suitable stand.
Make sure the vehicle is upright.
2. Check:
Brake fluid level
Below the minimum level mark "a" → ...
 Checking the rear brake pads
The following procedure applies to all of the
brake pads.
1. Operate the brake.
2. Check:
Rear brake pad
Wear indicator groove "a" has almost disappeared
Replace the brake pads as a set. ...
Other materials:
Adjusting the rear disc brake
1. Check:
Brake pedal position
(distance "a" from the center of the rider footrest
to the center of the brake pedal)
Out of specification Adjust.
2. Adjust:
Brake pedal position
a. Loosen the locknut "1".
b. Remove the cotter pin "2", washer "3", and
pin "4".
c. Turn t ...
Circuit diagram
2. Crankshaft position sensor
4. Main fuse
5. Main switch
6. Radiator fan motor fuse
8. Sidestand switch
9. Battery
17.Engine stop switch
19.Intake air pressure sensor
20.Intake air temperature sensor
21.Throttle position sensor
22.Coolant temperature sensor
23.Lean angle sensor
24.S ...
Checking the crankshaft position sensor
1. Disconnect:
Crankshaft position sensor coupler
(from the wire harness)
2. Check:
Crankshaft position sensor resistance
Out of specification Replace
the crankshaft
position sensor/stator assembly.
a. Connect the pocket tester ( × 100) to the
crankshaft position sensor c ...