Yamaha YZF-R125 Service Manual: Changing the coolant
1. Remove:
- Lower side cowlings Refer to "GENERAL CHASSIS" on page 4-1.
2. Remove:
- Radiator cap "1"
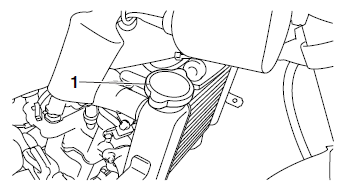
| WARNING A hot radiator is under pressure. Therefore, do not remove the radiator cap when the engine is hot. Scalding hot fluid and steam may be blown out, which could cause serious injury. When the engine has cooled, open the radiator cap as follows: Place a thick rag or a towel over the radiator cap and slowly turn the radiator cap counterclockwise toward the detent to allow any residual pressure to escape. When the hissing sound has stopped, press down on the radiator cap and turn it counterclockwise to remove. |
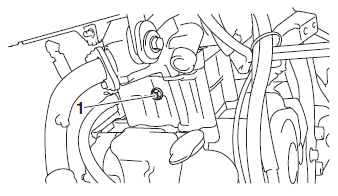
3. Remove:
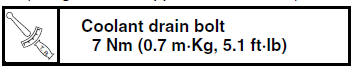
- Coolant drain bolt "1" (along with the copper washer)
4. Drain:
- Coolant (from the engine and radiator)
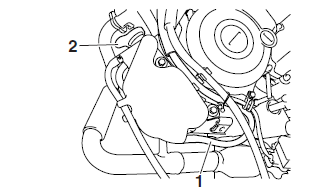
5. Disconnect:
- Coolant reservoir hose "1"
6. Remove:
- Coolant reservoir cap "2"
7. Drain:
- Coolant (from the coolant reservoir)
8. Connect:
- Coolant reservoir hose
9. Install:
- Coolant drain bolt
(along with the copper washer
 )
)
10.Fill:
- Cooling system
(with the specified amount of the recommended
coolant)

Handling notes for coolant Coolant is potentially harmful and should be handled with special care.
WARNING
|
CAUTION:
|
11.Install:
- Radiator cap
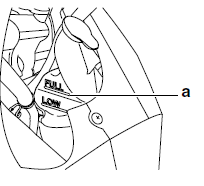
12.Fill:
- Coolant reservoir
(with the recommended coolant to the maximum
level mark "a")
13.Install:
- Coolant reservoir cap
14.Start the engine, warm it up for several minutes, and then turn it off.
15.Check:
- Coolant level Refer to "CHECKING THE COOLANT LEVEL" on page 3-15.
NOTE:
Before checking the coolant level, wait a few minutes until the coolant has settled.
16.Install:
- Lower side cowlings Refer to "GENERAL CHASSIS" on page 4-1.
 Checking the cooling system
1. Remove:
Side covers
Upper side cowlings
Refer to "GENERAL CHASSIS" on page 4-1.
2. Check:
Radiator "1"
Radiator inlet hose "2"
Radiator outlet hose "3"
Coolant reservoir hose ...
 Chassis
...
Other materials:
Be a Responsible Owner
As the vehicle's owner, you are responsible
for the safe and proper operation
of your motorcycle.
Motorcycles are single-track vehicles.
Their safe use and operation are dependent
upon the use of proper riding
techniques as well as the expertise of
the operator. Every operator should
...
Checking the drive sprocket
1. Check:
Drive sprocket
More than 1/4 tooth "a" wear
Replace the
drive chain sprockets as a set.
Bent teeth Replace the drive
chain sprockets
as a set.
b. Correct
1. Drive chain roller
2. Drive chain sprocket
Checking the rear wheel sprocket
Refer to "CHECKING AND R ...
Checking and adjusting the steering head
1. Stand the vehicle on a level surface
WARNINGSecurely support the vehicle so that there
is
no danger of it falling over.
NOTE:
Place the vehicle on a suitable stand so that the
front wheel is elevated.
2. Check:
Steering head
Grasp the bottom of the front fork legs an ...