
Yamaha YZF-R125 Service Manual: Removing the throttle body
1. Extract the fuel in the fuel tank through the fuel tank filler hole with a pump.
2. Disconnect:
- Fuel hose
| WARNING Cover the fuel hose connections with a cloth when disconnecting them. Residual pressure in the fuel lines could cause fuel to spurt out when removing the hoses. |
NOTE:
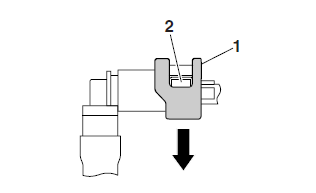
- To remove the fuel hose from the fuel injector, slide the fuel hose connector cover "1" on the end of the hose in the direction of the arrow shown, press the two buttons "2" on the sides of the connector, and then remove the hose.
- Remove the fuel hose manually without using any tools.
- Before removing the hose, place a few rags in the area under where it will be removed.
3. Remove:
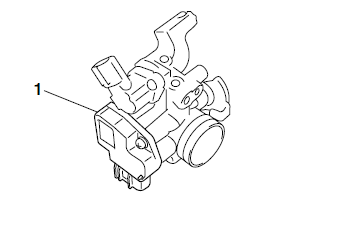
- Throttle body
| CAUTION: Do not remove the throttle body sensor assembly "1" from the throttle body. |
Checking the fuel injector
1. Check:
- Fuel injector
Damage
 Replace.
 Throttle body
...
 Checking the throttle body
1. Check:
Throttle body
Cracks/damage Replace the
throttle body.
2. Check:
Fuel passages
Obstruction Clean.
a. Wash the throttle body in a petroleum-based
solvent.
Do not us ...
Other materials:
Sidestand
The sidestand is located on the left side
of the frame. Raise the sidestand or
lower it with your foot while holding the
vehicle upright.
TIP
The built-in sidestand switch is part of
the ignition circuit cut-off system, which
cuts the ignition in certain situations.
WARNING
The vehicl ...
Checking the piston rings
1. Measure:
Piston ring side clearance
Out of specification Replace the
piston
and piston rings as a set.
NOTE:
Before measuring the piston ring side clearance,
eliminate any carbon deposits from the piston
ring grooves and piston rings.
2. Install:
Piston ring
(into the cylind ...
Checking the condition of the bulbs
The following procedure applies to all of the
bulbs.
1. Remove:
Bulb
WARNINGSince the headlight bulbs get extremely
hot,
keep flammable products and your hands
away from them until they have cooled
down.
CAUTION:
Be sure to hold the socket firmly when re ...