Yamaha YZF-R125 Service Manual: Checking the rear brake caliper
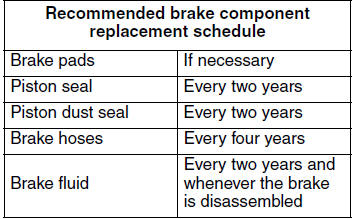
1. Check:
- Brake caliper piston "1"
Rust/scratches/wear
 Replace the
brake caliper piston. - Brake caliper cylinder "2"
Scratches/wear
 Replace the
brake caliper assembly. - Brake caliper body "3"
Cracks/damage
 Replace the
brake caliper assembly. - Brake fluid delivery passages
(brake caliper body)Obstruction
Blow out with compressed air.Obstruction Blow out with compressed air.
| WARNING Whenever a brake caliper is disassembled, replace the brake caliper piston dust seals and piston seals. |
2. Check:
- Brake caliper bracket
Cracks/damage
 Replace.
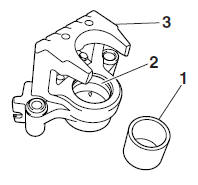
 Disassembling the rear brake caliper
1. Remove:
Brake caliper piston "1"
Brake caliper piston dust seal "2"
Brake caliper piston seal "3"
a. Blow compressed air into the brake hose joint
opening "a" to force out the pisto ...
 Assembling the rear brake caliper
WARNING
Before installation, all internal brake components
should be cleaned and lubricated
with clean or new brake fluid.
Never use solvents on internal brake components
as ...
Other materials:
Assembling the rear brake caliper
WARNING
Before installation, all internal brake components
should be cleaned and lubricated
with clean or new brake fluid.
Never use solvents on internal brake components
as they will cause the brake caliper
piston dust seal and piston seal to swell
and distort.
...
Removing the front brake caliper
NOTE:
Before disassembling the brake caliper, drain
the brake fluid from the entire brake system.
1. Remove:
Brake hose union bolt "1"
Copper washers "2"
Brake hose "3"
NOTE:
Put the end of the brake hose into a container
and pump out the brake fluid carefully.
...
Checking and lubricating the brake and clutch levers
Brake lever
Brake lever
Clutch lever
Clutch lever
The operation of the brake and clutch
levers should be checked before each
ride, and the lever pivots should be lubricated
if necessary.
Recommended lubricants:Brake lever:
Silicone grease
Clutch lever:
Lithium-soap ...