Yamaha YZF-R125 Owners Manual: Fuel tank cap
Fuel tank cap
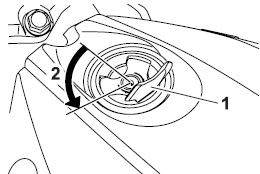
- Fuel tank cap lock cover
- Unlock.
To remove the fuel tank cap
- Open the fuel tank cap lock cover.
- Insert the key into the lock and turn it 1/4 turn counterclockwise. The lock will be released and the fuel tank cap can be removed.
To install the fuel tank cap
- Push the fuel tank cap into position with the key inserted in the lock.
- Turn the key clockwise to the original position, and then remove it.
- Close the lock cover.
TIP
The fuel tank cap cannot be installed
unless the key is in the lock. In addition,
the key cannot be removed if the cap is
not properly installed and locked.
 WARNING
Make sure that the fuel tank cap is
properly installed before riding.
Leaking fuel is a fire hazard.
 Brake pedal
Brake pedal
Brake pedal
The brake pedal is on the right side of
the motorcycle. To apply the rear
brake, press down on the brake pedal. ...
 Fuel
Fuel
Make sure there is sufficient gasoline in
the tank.
WARNING
Gasoline and gasoline vapors are
extremely flammable. To avoid fires
and explosions and to reduce the
risk of injury when refueli ...
Other materials:
Checking the connections
Check the leads, couplers, and connectors for
stains, rust, moisture, etc.
1. Disconnect:
Lead
Coupler
Connector
2. Check:
Lead
Coupler
Connector
Moisture → Dry with an air blower.
Rust/stains → Connect and disconnect several
times.
3. Check:
All co ...
Cleaning the air filter element
NOTE:
There is a check hose "1" at the bottom of the air
filter case. If dust and/or water collects in this
hose, clean the air filter element and air filter
case.
1. Remove:
Rider seat
Refer to "GENERAL CHASSIS" on page 4-1.
2. Remove:
Fuel tank
Refer to "FUEL TANK" on page ...
Aftermarket Parts, Accessories, and Modifications
While you may find aftermarket products
similar in design and quality to
genuine Yamaha accessories, recognize
that some aftermarket accessories
or modifications are not suitable because
of potential safety hazards to you
or others. Installing aftermarket products
or having other modif ...