Yamaha YZF-R125 Owners Manual: Removing and installing the cowlings and panel
Removing and installing the cowlings and panel
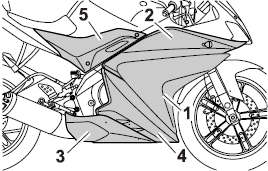
- Cowling A
- Cowling B
- Cowling C
- Cowling D
- Panel A
The cowlings and panel shown need to be removed to perform some of the maintenance jobs described in this chapter. Refer to this section each time a cowling or panel needs to be removed and installed.
Cowling A
To remove the cowling
Remove the screws, and then take the cowling off.
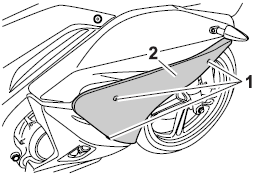
-
Screw
-
Cowling A
To install the cowling
Place the cowling in the original position, and then install the screws.
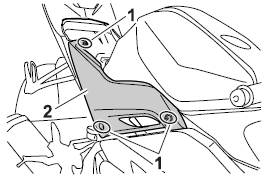
Cowling B
To remove the cowling
- Remove cowling A and panel A.
- Remove the screws, slide the cowling forward, and then take it off.
- Disconnect the turn signal light lead coupler.
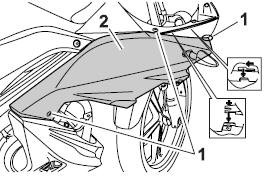
-
Screw
-
Cowling B
To install the cowling
- Connect the turn signal light lead coupler.
- Fit the projection on the cowling into the slot, and then slide the cowling backward.
- Install the screws.
- Install cowling A and panel A.
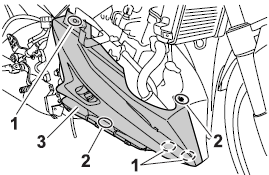
Cowling C
To remove the cowling
Remove the screws, and then pull the cowling off as shown.
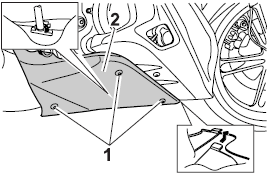
-
Screw
-
Cowling C
To install the cowling
Place the cowling in the original position, and then install the screws.
Cowling D
To remove the cowling
- Remove panel A, cowlings A, B and C.
- Remove the screws and the quick fasteners, and then take the cowling off.
TIP
The quick fastener is removed by pushing
the center pin in with a screwdriver,
then pulling the fastener out.
-
Quick fastener
-
Screw
-
Cowling D
To install the cowling
- Place the cowling in the original position, and then install the screws and the quick fasteners.
TIP
To install the quick fasteners, push the
center pin out so that it will protrude
from the fastener head, insert the fastener
into the cowling, and then push
the protruding pin in until it is flush with
the fastener head.
- Install cowlings C, B, A and panel A.
Panel A
To remove the panel
- Remove the rider seat.
- Remove the screws, and then take the panel off.
-
Screw
-
Panel A
To install the panel
- Place the panel in the original position, and then install the screws.
- Install the rider seat.
 General maintenance and lubrication chart
TIP
The air filter needs more frequent service if you are riding in
unusually wet or dusty areas.
Hydraulic brake service
Regularly check and, if necessary, correct the ...
 Checking the spark plug
The spark plug is an important engine
component, which is easy to check.
Since heat and deposits will cause any
spark plug to slowly erode, the spark
plug should be removed and checked
in ac ...
Other materials:
Checking and charging the battery
WARNINGBatteries generate explosive hydrogen gas
and contain electrolyte which is made of poisonous
and highly caustic sulfuric acid.
Therefore, always follow these preventive
measures:
Wear protective eye gear when handling or
working near batteries.
Charge batt ...
Checking the rectifier/regulator
1. Check:
Rectifier/regulator output voltage
Out of specification → Replace the
rectifier/
regulator.
a. Set the engine tachometer to the spark plug
lead.
b. Connect the pocket tester (DC 20 V) to the
rectifier/regulator coupler as shown.
Positive tester probe
red "1"
Negat ...
Ecu self-diagnostic function
The ECU is equipped with a self-diagnostic function in order to ensure that
the fuel injection system is
operating normally. If this function detects a malfunction in the system, it
immediately operates the engine
under substitute characteristics and illuminates the engine trouble warning
li ...