Yamaha YZF-R125 Owners Manual: Checking the spark plug
The spark plug is an important engine component, which is easy to check. Since heat and deposits will cause any spark plug to slowly erode, the spark plug should be removed and checked in accordance with the periodic maintenance and lubrication chart. In addition, the condition of the spark plug can reveal the condition of the engine.
To remove the spark plug
- Remove cowling A.
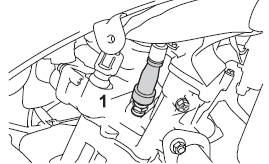
- Remove the spark plug cap.
-
Spark plug cap
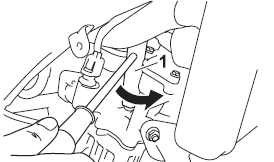
- 3. Remove the spark plug as shown, with the spark plug wrench included in the owner's tool kit.
-
Spark plug wrench
To check the spark plug
- Check that the porcelain insulator around the center electrode of the spark plug is a medium-to-light tan (the ideal color when the vehicle is ridden normally).
TIP
If the spark plug shows a distinctly different
color, the engine could be operating
improperly. Do not attempt to
diagnose such problems yourself. Instead,
have a Yamaha dealer check
the vehicle.
- Check the spark plug for electrode erosion and excessive carbon or other deposits, and replace it if necessary.
| Specified spark plug: NGK/CR8E |
To install the spark plug
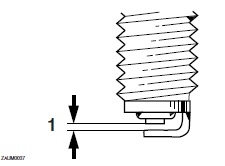
- Measure the spark plug gap with a wire thickness gauge and, if necessary, adjust the gap to specification.
-
Spark plug gap
| Spark plug gap: 0.7-0.8 mm (0.028-0.031 in) |
- Clean the surface of the spark plug gasket and its mating surface, and then wipe off any grime from the spark plug threads.
- Install the spark plug with the spark plug wrench, and then tighten it to the specified torque.
| Tightening torque: Spark plug: 12.5 Nm (1.25 m.kgf, 9.0 ft.lbf) |
TIP
If a torque wrench is not available when
installing a spark plug, a good estimate
of the correct torque is 1/4-1/2 turn
past finger tight. However, the spark
plug should be tightened to the specified
torque as soon as possible.
- Install the spark plug cap.
- Install the cowling.
 Removing and installing the cowlings and panel
Removing and installing the cowlings and panel
Cowling A
Cowling B
Cowling C
Cowling D
Panel A
The cowlings and panel shown need to
be removed to perform some of the
maintenance ...
 Engine oil and oil filter element
The engine oil level should be checked
before each ride. In addition, the oil
must be changed and the oil filter element
replaced at the intervals specified
in the periodic maintenance and lub ...
Other materials:
Troubleshooting
Any of the following fail to light: headlight, high beam indicator light,
taillight, license plate light, auxiliary
light or meter light.
NOTE:
Before troubleshooting, remove the following part(s):
1. Seats
2. Fuel tank
...
Checking the steering head
1. Wash:
Bearings
Bearing races
2. Check:
Bearings
Bearing races
Damage/pitting →Replace.
3. Replace:
Bearings
Bearing races
a. Remove the bearing races from the steering
head pipe with a long rod "1" and hammer.
b. Remove the bearing race from the lower
bracket ...
Installing the rear brake caliper
1. Install:
Brake caliper "1"
Copper washers
Brake hose "2"
Union bolt "3"
WARNINGProper brake hose routing is essential to
insure
safe vehicle operation. Refer to "CABLE
ROUTING" on page 2-33.
CAUTION:When installing the brake hose onto the
brake calip ...