Yamaha YZF-R125 Service Manual: Installing the throttle body
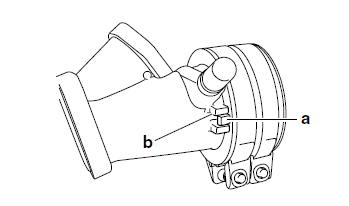
1. Install:
- Throttle body joint clamps
NOTE:
Align the projections "a" on the throttle body joint with the slot "b" in each throttle body joint clamp.
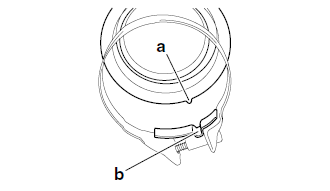
2. Install:
- Throttle body joint
NOTE:
Align the projection "a" on the throttle body joint with the slot "b" in the intake manifold.
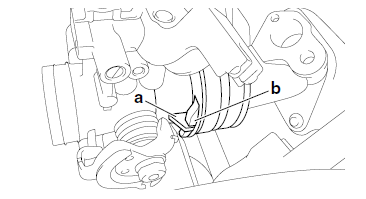
3. Install:
- Throttle body
NOTE:
Align the projection "a" on the throttle body with the slot "b" in the throttle body joint.
4. Adjust:
Throttle cable free play Refer to "ADJUSTING THE THROTTLE CABLE FREE PLAY" on page 3-6.
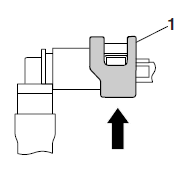
5. Connect:
- Fuel hose
| CAUTION: When installing the fuel hose, make sure that it is securely connected, and that the fuel hose connector cover on the fuel hose is in the correct position, otherwise the fuel hose will not be properly installed. |
NOTE:
- Install the fuel hose securely onto the fuel pump until a distinct "click" is heard.
- To install the fuel hose onto the fuel pump,
slide the fuel hose connector cover "1" on the
end of the hose in the direction of the arrow
shown.
 Checking the throttle body
1. Check:
Throttle body
Cracks/damage Replace the
throttle body.
2. Check:
Fuel passages
Obstruction Clean.
a. Wash the throttle body in a petroleum-based
solvent.
Do not us ...
 Air induction system
1. Air induction system hose (air filter case to
reed valve assembly)
2. Air induction system reed valve assembly
3. Air induction system hose (reed valve
assembly to exhaust pipe)
Checki ...
Other materials:
Lubrication diagrams
Clutch push lever
Main axle
Drive axle
Crankshaft
Oil filter
Oil pump assembly
Oil strainer
To cylinder head
Camshaft
Crankshaft
Main axle
Drive axle
...
Installing the front fork legs
The following procedure applies to both of the
front fork legs.
1. Install:
Front fork leg
Temporarily tighten the upper and lower
bracket pinch bolts.
NOTE:
Make sure the inner tube end position "a" is 24.5
mm (0.96 in) from the top of the upper bracket.
2. Tighten:
Lower br ...
Adjusting the throttle cable free play
NOTE:
Prior to adjusting the throttle cable free play, the
engine idling speed should be adjusted.
1. Check:
Throttle cable free play "a"
Out of specification →Adjust.
2. Remove:
Right side panel
Refer to "GENERAL CHASSIS" on page 4-1.
3. Adjust:
Throttle cable f ...