
Yamaha YZF-R125 Service Manual: Installing the fuel hose
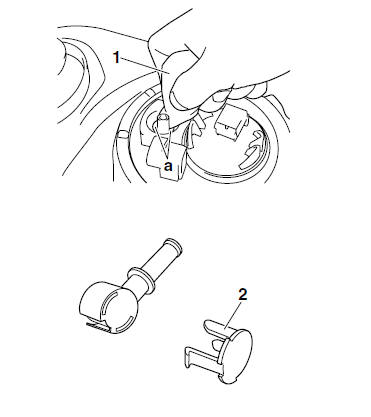
1. Install:
- Fuel hose
- Fuel hose connector cover
| CAUTION: When installing the fuel hose, make sure that it is securely connected, and that the fuel hose connector cover is in the correct position, otherwise the fuel hose will not be properly installed. |
NOTE:
- Wipe up any fuel remaining in the recess "a" in the fuel pump with a dry rag "1"
- After installing the fuel hose connector cover "2", make sure that it is installed securely.
 Removing the fuel tank
1. Extract the fuel in the fuel tank through the
fuel tank filler hole with a pump.
2. Remove:
Fuel hose connector cover "1"
3. Disconnect:
Fuel hose "2"
CAUTION:
Be sure ...
 Checking the fuel pressure
1. Check:
Pressure regulator operation
a. Remove the fuel hose connector cover "1"
and disconnect the fuel hose "2" from the fuel
pump.
CAUTION:Although the fuel has been removed from ...
Other materials:
Checking the oil pump
1. Check:
Oil pump drive gear
Oil pump driven gear
Oil pump housing
Oil pump housing cover
Cracks/damage/wear Replace the
defective
part(s).
2. Measure:
Inner-rotor-to-outer-rotor-tip clearance "a"
Outer-rotor-to-oil-pump-housing clearance
"b"
- Oil-pump-housing-to-inn ...
Checking the starter motor operation
1. Check:
Starter motor operation
Does not operate → Perform the electric
starting system troubleshooting, starting with
step 4.
Refer to "TROUBLESHOOTING" on page
8-9.
a. Connect the positive battery terminal "1" and
starter motor lead "2" with a jumper lead "3".
W ...