Yamaha YZF-R125 Owners Manual: Indicator and warning lights
Indicator and warning lights
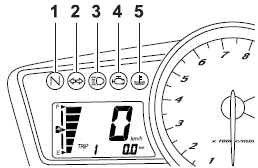
- Neutral indicator light"
 "
" - Turn signal indicator light"
 "
" - High beam indicator light"
 "
" - Engine trouble warning light"
 "
" - Coolant temperature warning light"
 "
"
Turn signal indicator light"
"
This indicator light flashes when the turn signal switch is pushed to the left or right.
Neutral indicator light""
This indicator light comes on when the transmission is in the neutral position.
High beam indicator light""
This indicator light comes on when the high beam of the headlight is switched on.
Coolant temperature warning light"
"
This warning light comes on if the engine overheats. If this occurs, stop the engine immediately and allow the engine to cool.
The electrical circuit of the warning light can be checked by turning the key to "ON". The warning light should come on for a few seconds, and then go off. If the warning light does not come on initially when the key is turned to "ON", or if the warning light remains on, have a Yamaha dealer check the electrical circuit.
NOTICE
Do not continue to operate the engine
if it is overheating.
TIP
- For radiator-fan-equipped vehicles, the radiator fan(s) automatically switch on or off according to the coolant temperature in the radiator.
- If the engine overheats, see page 6-38 for further instructions.
Engine trouble warning light""
This warning light flashes or stays on if an electrical circuit monitoring the engine is not working correctly. If this occurs, have a Yamaha dealer check the self-diagnosis system.
The electrical circuit of the warning light can be checked by turning the key to "ON". The warning light should come on for a few seconds, and then go off. If the warning light does not come on initially when the key is turned to "ON", or if the warning light remains on, have a Yamaha dealer check the electrical circuit.
 Main switch/steering lock
Main switch/steering lock
The main switch/steering lock controls
the ignition and lighting systems, and is
used to lock the steering. The various
positions are described below.
ON
All ele ...
 Tachometer
Tachometer
Tachometer
Tachometer red zone
The electric tachometer allows the rider
to monitor the engine speed and keep it
within the ideal power range.
When the key is turned to "ON ...
Other materials:
Installing the camshaft and rocker arms
1. Lubricate:
Rocker arms
Rocker arm shafts
2. Lubricate:
Camshaft
3. Install:
Camshaft "1"
NOTE:
Make sure that the camshaft projections "a" and
hole "b" are positioned as shown in the illustration.
4. Install:
Rocker arms
Rocker arm shafts "1"
NOTE:
Make ...
Ignition circuit cut-off system
The ignition circuit cut-off system (comprising
the sidestand switch, clutch
switch and neutral switch) has the following
functions.
It prevents starting when the transmission
is in gear and the sidestand
is up, but the clutch lever is
not pulled.
It prevents starting when the t ...
Throttle position sensor
1. Check:
Throttle position sensor
a. Connect the digital circuit tester to the terminals
of the throttle body sensor assembly
coupler as shown.
Positive tester probe →
gray/red terminal "1"
Negative tester probe →
gray/black terminal "2"
b. Measure the throttle pos ...