Yamaha YZF-R125 Owners Manual: Adjusting the engine idling speed
The engine idling speed must be checked and, if necessary, adjusted as follows at the intervals specified in the periodic maintenance and lubrication chart. The engine should be warm before making this adjustment.
- Remove panel A.
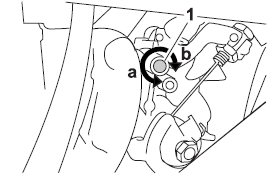
- Check the engine idling speed and, if necessary, adjust it to specification by turning the idle adjusting screw. To increase the engine idling speed, turn the screw in direction (a). To decrease the engine idling speed, turn the screw in direction (b).
-
Idle adjusting screw
| Engine idling speed: 1300-1500 r/min |
TIP
If the specified idling speed cannot be
obtained as described above, have a
Yamaha dealer make the adjustment.
- Install the panel.
 Replacing the air filter element and cleaning the check hose
The air filter element should be replaced
at the intervals specified in the
periodic maintenance and lubrication
chart. Have a Yamaha dealer replace
the air filter element more frequently if
...
 Adjusting the throttle cable free play
Throttle cable free play
The throttle cable free play should measure
3.0-5.0 mm (0.12-0.20 in) at the
throttle grip. Periodically check the
throttle cable free play and, if necessar ...
Other materials:
Removing the front wheel (disc)
1. Stand the vehicle on a level surface.
WARNINGSecurely support the vehicle so that there
is
no danger of it falling over.
2. Elevate:
Front wheel
NOTE:
Place the vehicle on a suitable stand so that the
front wheel is elevated.
3. Remove:
Front brake caliper
NO ...
Faulty clutch
Clutch slips
1. Clutch
Improperly assembled clutch
Improperly adjusted clutch cable
Loose or fatigued clutch spring
Worn friction plate
Worn clutch plate
2. Engine oil
Incorrect oil level
Incorrect oil viscosity (low)
Deteriorated oil
Clutch drags
1. Clutch
Unevenly t ...
Introduction
WARNINGDisc brake components rarely require
disassembly.
Therefore, always follow these preventive
measures:
Never disassemble brake components unless
absolutely necessary.
If any connection on the hydraulic brake
system is disconnected, the entire brake
sy ...