Yamaha YZF-R125 Owners Manual: Checking the front fork
The condition and operation of the front fork must be checked as follows at the intervals specified in the periodic maintenance and lubrication chart.
To check the condition
Check the inner tubes for scratches, damage and excessive oil leakage.
To check the operation
- Place the vehicle on a level surface and hold it in an upright position. WARNING! To avoid injury, securely support the vehicle so there is no danger of it falling over.
- While applying the front brake, push down hard on the handlebars several times to check if the front fork compresses and rebounds smoothly.
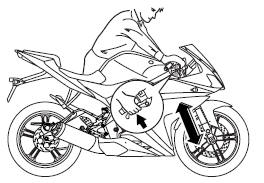
Checking the front fork
NOTICE
If any damage is found or the front
fork does not operate smoothly,
have a Yamaha dealer check or repair
it.
 Lubricating the swingarm pivots
The swingarm pivots must be lubricated
at the intervals specified in the periodic
maintenance and lubrication chart.
Recommended lubricant:Molybdenum disulfide grease
...
 Checking the steering
Worn or loose steering bearings may
cause danger. Therefore, the operation
of the steering must be checked as follows
at the intervals specified in the periodic
maintenance and lubrication
c ...
Other materials:
Checking the camshaft
1. Check:
Camshaft lobes
Blue discoloration/pitting/scratches
Replace
the camshaft.
2. Measure:
Camshaft lobe dimensions "a" and "b"
Out of specification Replace
the camshaft.
3. Check:
Camshaft oil passage
Obstruction Blow out with
compressed air. ...
Tires
To maximize the performance, durability,
and safe operation of your motorcycle,
note the following points regarding
the specified tires.
Tire air pressure
The tire air pressure should be checked
and, if necessary, adjusted before each
ride.
WARNING
Operation of this vehicle with impro ...
Checking the timing chain tensioner
1. Check:
Timing chain tensioner
Cracks/damage/rough movement Replace.
a. Lightly press the timing chain tensioner rod
into the timing chain tensioner housing by
hand.
NOTE:
While pressing the timing chain tensioner rod,
wind it clockwise with a thin screwdriver "1" until
it stops.
b. ...