Yamaha YZF-R125 Service Manual: Installing the clutch
1. Install:
- Conical spring washer "1"
NOTE:
Install the conical spring washer as shown in the illustration.
2. Install:
- Clutch housing
- Thrust washer "1"
NOTE:
Be sure to install the thrust washer so that its sharp edge "a" is facing away from the clutch boss.
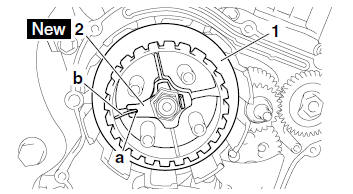
3. Install:
- Clutch boss "1"
- Lock washer "2"

- Clutch boss nut
NOTE:
- Lubricate the clutch boss nut threads and lock washer mating surfaces with engine oil.
- Align the notch "a" in the lock washer with a rib "b" on the clutch boss.
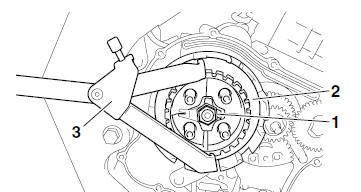
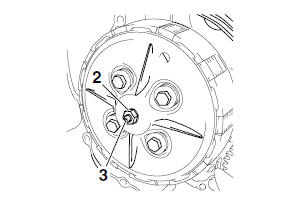
4. Tighten:
- Clutch boss nut "1"

NOTE:
While holding the clutch boss "2" with the universal
clutch holder "3", tighten the clutch boss nut.
5. Bend the lock washer tab along a flat side of the nut.
6. Lubricate:
- Friction plates
- Clutch plates
(with the recommended lubricant)

7. Install:
- Clutch damper spring seat "1"
- Clutch damper spring "2"
- Friction plate 2
- Clutch plates
- Friction plates 3
- Friction plate 1
NOTE:
- Install the clutch damper spring seat and clutch damper spring as shown in the illustration.
- First, install a friction plate and then alternate between a clutch plate and a friction plate.
8. Install:
- Pressure plate
- Clutch springs
- Clutch spring bolts "1"
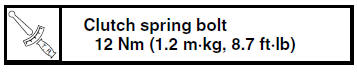
NOTE:
Tighten the clutch spring bolts in stages and in a crisscross pattern.
9. Adjust:
- Clutch mechanism free play
a. Check that projection "a" on the clutch push lever "1" aligns with mark "b" shown on the crankcase in the illustration by pushing the clutch push lever manually in direction "c" until it stops.
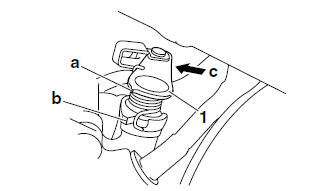
b. If projection "a" is not aligned with mark "b", align them as follows:
- Loosen the locknut "2".
- With the clutch push lever fully pushed in direction "c", turn the short clutch push rod "3" in or out until projection "a" aligns with mark "b".
- Hold the short clutch push rod to prevent it
from moving and then tighten the locknut to
specification.

10.Install:
- Oil seal "1"

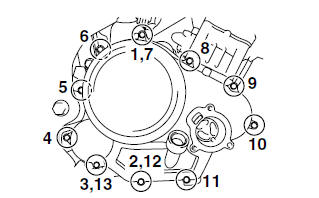
11.Install:
- Clutch cover

NOTE:
Tighten the clutch cover bolts in the proper tightening sequence as shown.
12.Adjust:
- Clutch cable free play Refer to "ADJUSTING THE CLUTCH CABLE FREE PLAY" on page 3-12.
 Checking the primary driven gear
1. Check:
Primary driven gear "1"
Damage/wear Replace the
primary drive
gear and clutch housing as a set.
Excessive noise during operation
Replace
the primary drive gear and ...
 Oil pump
...
Other materials:
Checking the ignition coil
1. Check:
Primary coil resistance
Out of specification Replace.
a. Disconnect the ignition coil connectors from
the ignition coil terminals.
b. Connect the pocket tester ( × 1)
to the ignition
coil as shown.
Positive tester probe
red/white "1"
Negative tester probe
orange ...
Adjusting the brake pedal free play
Adjusting the brake pedal free play
Brake pedal free play
The brake pedal free play should measure
3.5-4.5 mm (0.14-0.18 in) as
shown. Periodically check the brake
pedal free play and, if necessary, have
a Yamaha dealer adjust it.
WARNING
An incorrect brake pedal free play
in ...
Faulty lighting or signaling system
Headlight does not come on
- Wrong headlight bulb
- Too many electrical accessories
- Hard charging
- Incorrect connection
- Improperly grounded circuit
- Poor contacts (main or light switch)
- Burnt-out headlight bulb
Headlight bulb burnt out
- Wrong headlight bulb
- Faulty battery
- Fau ...