Yamaha YZF-R125 Owners Manual: Drive chain slack
The drive chain slack should be checked before each ride and adjusted if necessary.
To check the drive chain slack
- Place the motorcycle on the sidestand.
TIP
When checking and adjusting the drive
chain slack, there should be no weight
on the motorcycle.
- Shift the transmission into the neutral position.
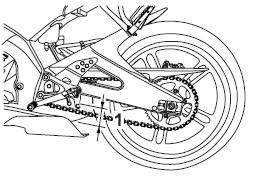
- Move the rear wheel by pushing the motorcycle to locate the tightest portion of the drive chain, and then measure the drive chain slack as shown.
| Drive chain slack: 30.0-40.0 mm (1.18-1.57 in) |
-
Drive chain slack
- If the drive chain slack is incorrect, adjust it as follows.
To adjust the drive chain slack
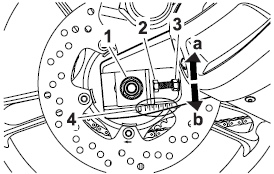
- Loosen the axle nut and the locknut on each side of the swingarm.
-
Axle nut
-
Drive chain slack adjusting bolt
-
Locknut
-
Alignment marks
- To tighten the drive chain, turn the drive chain slack adjusting bolt on each side of the swingarm in direction (a). To loosen the drive chain, turn the adjusting bolt on each side of the swingarm in direction (b), and then push the rear wheel forward. NOTICE: Improper drive chain slack will overload the engine as well as other vital parts of the motorcycle and can lead to chain slippage or breakage. To prevent this from occurring, keep the drive chain slack within the specified limits.
TIP
Using the alignment marks on each
side of the swingarm, make sure that
both drive chain pullers are in the same
position for proper wheel alignment.
- Tighten the axle nut, then the locknuts to their specified torques.
| Tightening torques: Axle nut: 85 Nm (8.5 m.kgf, 61 ft.lbf) Locknut: 16 Nm (1.6 m.kgf, 11 ft.lbf) |
 Changing the brake fluid
Have a Yamaha dealer change the
brake fluid at the intervals specified in
the periodic maintenance and lubrication
chart. In addition, have the brake
hose replaced every four years or
whenev ...
 Cleaning and lubricating the drive chain
The drive chain must be cleaned and
lubricated at the intervals specified in
the periodic maintenance and lubrication
chart, otherwise it will quickly wear
out, especially when riding in dusty ...
Other materials:
Adjusting the valve clearance
The following procedure applies to all of the
valves.
NOTE:
Valve clearance adjustment should be made
on a cold engine, at room temperature.
When the valve clearance is to be measured or
adjusted, the piston must be at top dead center
(TDC) on the compression stroke.
1. Remove:
...
For your safety - pre-operation checks
Inspect your vehicle each time you use it to make sure the vehicle is in safe
operating condition. Always follow the inspection
and maintenance procedures and schedules described in the Owner's Manual.
WARNING
Failure to inspect or maintain the vehicle properly increases the possibility of
...